Among the most underrated of mixing tools is the noise gate. It can do wonders for cleaning up loose sounds and emphasizing various aspects of a sound’s dynamics. A lesser known fact is that it can be used as a unique creative processing tool. In this tip we will look at one way of doing this by combining Logic’s noise gate with some creative routing techniques in order to create a dynamic auto panner.

Set Up
If you are unfamiliar with noise gates, the controls are fairly simple and I would suggest looking in your product manual for a more in depth explanation as this tip is going to assume some degree of basic knowledge.What we are going to make is an effect that pans a signal according to its level. In this case, a reverb which pans left when it’s output is above a certain level and pans right when it’s output is below that same level.
For this example, I have instantiated Ultrabeat and sent a clap to direct out as well as a reverb aux. I have then compressed the reverb (more on why I did this later) and sent the reverb to two aux. channels where I have placed noise gates. I have then sent the two gated verbs and the dry clap to a single aux. (just for added control) and sent that to my stereo out.
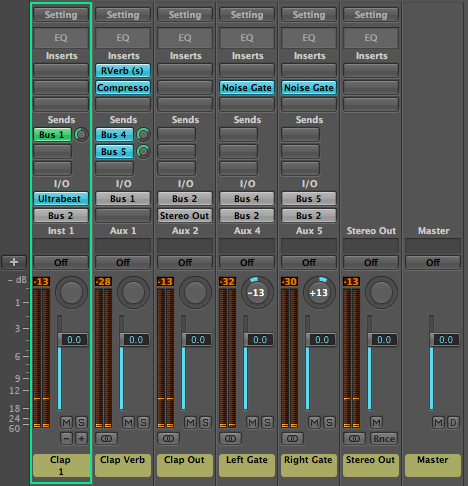
Your routing should look something like this.
Closing The Gate
I am now going to solo one of the gates and bring up the threshold until my reverb begins to chatter (the gate opens and closes very fast as the signal is centered around the threshold) which is made more prominent due to the compression evening out the signal earlier in the chain.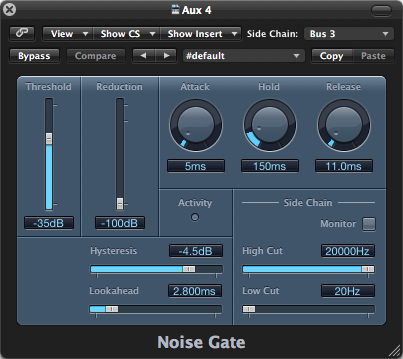
First noise gate.
First noise gate (left reverb).
From here, I will input the threshold setting into the second gate, but instead of having it cut the signal at the threshold, I will boost it by reversing the gain slider. Now the first gate will let the signal pass only above the threshold and the second gate will do the opposite and only let the signal pass below the threshold.

Second noise gate.
Second noise gate (right reverb).
More Possibilities
From here I can pan the two signals to opposite ends of the stereo spectrum or do any other number of things to each channel individually to create an auto panning effect (and then some) that responds to the signal dynamics. The possibilities are literally endlessDownload audio file (Both.mp3)
Both gates together.
Download audio file (wclap.mp3)
Reverb with clap.
Media Files
first.mp3 (MP3 Audio, 241 KB)
| How The Hell Do I Use Reverb Anyway?!? Basix July 30, 2010 at 1:00 AM |
| Reverb is one of the things that can make or break a mix. Too much and it will either sound like it’s from the eighties or just plain too cluttered to be able to hear correctly. Too little and you feel like every instrument is attacking you at once. Reverb is used to create space in a mix, realistic or thematic, and a different use of reverb can give the same song a completely different character. Give two mixers the same mix and only allow them to change all the reverbs. Chances are those mixes are going to come out very different from one another. In the following Basix tutorial I’ll go into the different parameters, reverb modes and use of reverb. With the use of audio examples to demonstrate what I’m getting at, it’s my hope that I can clear some doubts that you have surrounding it. Typical Reverb ParametersIn every reverb engine we have some of the same parameters to fiddle with. The more basic reverb plug-ins only have one or two parameters but some of the more advanced ones have almost unlimited capabilities for customization. Let’s look at some of the typical parameters we usually see in a reverb.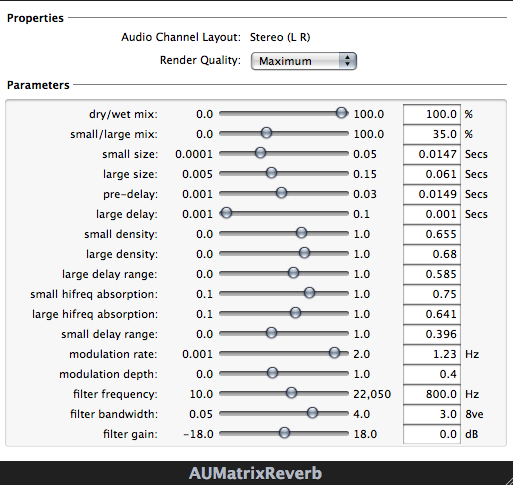
 The Different Reverb ModesThe spaces around you all sound different. The spacious reverb you get by walking into a European Cathedral is not the same as you would get from walking into your living room.Spaces interact with each other, sounding bigger and bigger as there is more of it. Audio engineers know how the different spaces sound and what we can accomplish musically by choosing the right space to give to our songs. The different spaces we can choose from in our productions are called room modes. Reverb modes are basically categories of different spaces that have a distinct character and sound. I’m going to be using a drum beat as an example of the various reverb modes, so before we put different reverbs on it, listen to it dry below. Download audio file (drumsdry.mp3) I’m adding the reverb to all of the drum tracks equally for demonstration purposes. Usually, we don’t necessarily need to add reverb to everything. Maybe putting a little reverb on the over-head microphone tracks is enough to give a drum-kit its space, but for the sake of listening we’ll be putting the whole drum-kit into the reverb.
 Using the Right ReverbNow that we’ve gone over the parameters and reverb modes, you have to know which reverb will work for any given situation. A grand hall reverb might work great on slow piano pieces, or soulful guitar solos, but it might not work that great with heavily distorted rhythm guitars. It doesn’t take a lot of experience to instinctively know which reverb mode or reverb time to use, but once you get the hang of how each reverb usually sounds and what works for each instrument you can work faster and more efficiently on your projects.Let’s see how a medium hall setting sounds like on two different guitar parts. The first one is a clean chordal part, that’s slow enough to make the reverb shine, but the second one is a rock riff that becomes undefined and muddy once we put the same reverb on it. Clean chordal part: Download audio file (mediumhallgtr1.mp3) Sweet and soulful. Rock Riff: Download audio file (mediumhallgtr2.mp3) Jumbled mess. Placing Instruments Into a RoomSay we have a song that we want to sound like it was recorded live, with all the instrument together in the room. All the instrument were tracked (recorded) separately in different studios, but they were all fairly dry sounding, meaning we can add any reverb we want to them. By choosing one nice sounding room or hall we can place the instruments together in that room and make them sound like they are all jamming inside a sweet sounding studio room.A good way to do this is to actually solo the reverb by itself and place each element into the room with sends. By sending each instrument separately you can place them closer or farther away in the room you have created. There is less of the drums sent into the room since I want them to be in the background. The bass is a little louder than the drums but the guitars are more dominant than the bass. Finally, the lead instrument, the accordion has the most amount sent to the reverb. 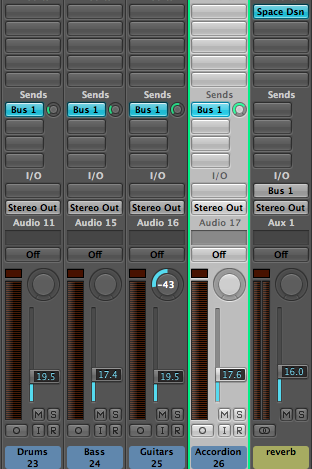 Listen to the soloed reverb here. This is only the instrument in the room without the original sounds. It sounds like something you would be hearing coming from a room far away. Download audio file (stereoreverbwet.mp3) Taking Out Unwanted ReverbEQing reverbs is an age old trick. Since you send your source sound to a specific reverb track you can modify and change your reverb sound as much as you want. The most common use is to put EQ in front of the reverb device and EQ out everything you don’t want, or accent a specific frequency that you want to jump out. The most common use is to filter out either highs, lows or both frequency ranges so that a reverb sits better with an instrument.Here is a drum track that has an overall reverb sound. The low end is a bit much so I’ve decided to filter out all the low end frequencies to about 500 Hz. That way the kick drum and low end of the drum kit doesn’t sound as cluttered but we still end up with a spacious drum sound. Too much low end reverb: Download audio file (drumrevnoeq.mp3) Low end filtered away: Download audio file (drumreveq.mp3) You can do this to any instrument obviously, and one trick I learned from one of Bobby Owsinski’s blog posts about reverb is to high- and low-pass filter instruments to achieve that Abbey Road sound. In this next piano part I’ve rolled off everything below 500 Hz as well as everything above 10 Khz. It give the piano part a much punchier sound. It has reverb but it doesn’t have any muddiness or ringing high frequencies to clutter it up. Piano without EQ: Download audio file (pianowet.mp3) A tighter piano sound with EQ: Download audio file (pianofiltered.mp3) Just a Little Bit of ‘VerbIf you want a punchy rock mix and don’t want to touch into glam rock dimension you should be sparse on the reverb. Making things sound dry doesn’t necessarily mean you can’t use reverb. You just have to use it sparingly with short reverb times, and have them low in the mix. A really dry sound is unnatural to listen to, so when you are mixing your next track that just needs a little reverb to push the elements into place consider these techniques.
Download audio file (vocalreverb.mp3) Mix and Match ReverbsYou can also have different reverbs on different elements of a mix. Take backing vocals for example. There is usually more reverb on backing vocals than the lead vocal, in order to push the backing vocals away from being the leading element. By using different reverbs on backing vocals you can create different contrasts that can sound pretty or in this case, kind of creepy.Here is an example of a backing vocal mix I did recently. There are two separate reverbs being used, one 2.2 second hall and one 3.3 second hall. We have dry copies of the main vocals panned across the spectrum as well as an ethereal reverbed backing vocal chanting in the background. Sounds kinda creepy, but that was the goal. First sample is the complete track with all the instruments and the second are the vocals only. Download audio file (backingvocals.mp3) Download audio file (backingvocalssolo.mp3) 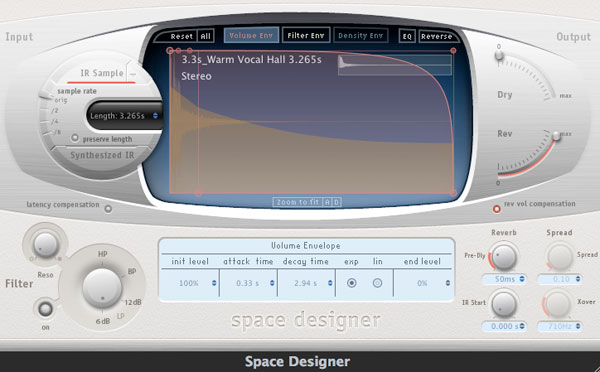 ConclusionReverb is a necessary ingredient in any mix, regardless if you want it to be heard or not. You can use it to add ambience, create spaces around instruments, construct specific moods or just make things sound punchier. However you use reverb, it is definitely one of the elements that you need to spend the most time with, experimenting with the different parameters, reverb modes and settings in order to familiarize yourself with how everything works and interconnects.I hope I have shed some light of how you can use the different reverb modes and given you some inspiring examples that you can use in your mixes. Since this is a Basix tutorial I want everyone to comment with any question they have regarding the doubts they have on reverb. No question is too stupid and everybody has scratched their head at some point over the workings of this ever elusive mixing ingredient. |
Join The Community