This tutorial will show you how you can create an additive synthesizer using a combinator in Reason. Additive synthesis is one of the less common forms of synthesis in use today, but it can be used to create some great sounds. Furthermore, following this tutorial is a great way to improve your understanding of some of the fundamental principals of sound and synthesis in general.Step 1The first step is to understand what we are trying to achieve in this exercise. If this seems overly complicated or confusing don’t be put off, the actual exercise is relatively simple, and should make things clear as you follow it through.Additive synthesis is a method for building up complex tones from simple ones. Most sounds we hear in the real world, for example a piano or a guitar are not just simple, linear wave shapes like a sawtooth or a square. They are in fact made up of many complex overtones, all at different frequencies and layered up over a ‘base’ or ‘fundamental frequency. A sine wave is a wave shape that has very few harmonics or overtones, and is essentially only the fundamental frequency of whatever note or frequency it is pitched to play. By layering up many sine waves we can artificially create the effect of a complex harmonic tone, with complete control over each individual overtone or harmonic in the sound. Step 2Now we are ready to begin. The first thing we need to do is to build a combinator patch which will allow us to generate a large number of sine waves at once, from a single key press or MIDI note trigger. For this we will need a combinator. After creating a combinator in your Reason file, create a full size (14:2) mixer inside the combinator, and then create a subtractor synthesizer.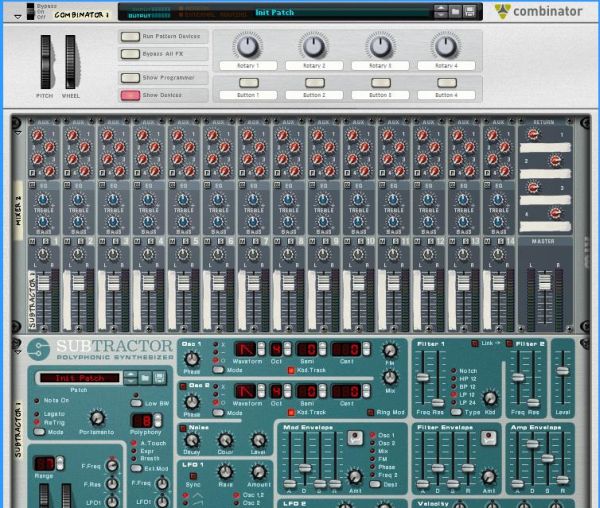 Step 3We now need to program the Subtractor to generate a simple sine wave. Firstly initialize the patch on the Subtractor. Once this is done change the wave shape on Oscillator 1 to a sine wave shape. Open the filter all the way and turn the volume all the way down. Turn the velocity>filter freq knob to the neutral position. Your patch should now look like this: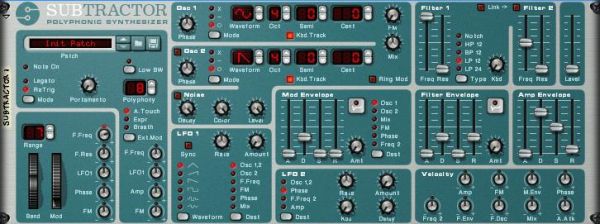 Step 4We will need a lot more than one sine wave generator to create a complex tone, so now create an additional seven subtractors inside the combinator. Once you have done this right click on the top one (the one where we edited the patch to generate a sine wave) and select ‘copy patch’. Now paste this patch onto each of the other Subtractors by right clicking on each in turn and choosing ‘paste patch’. You will now have a combinator with 8 Subtractors inside it, each with the same simple sine wave patch.Step 5Our basic template is now complete. You should now save the combinator patch at this point so that you can easily return to this stage and start experimenting with different additive synthesis sounds. We can now et into the meat of the exercise and begin generating our tones. For the first tone I am going to create a soft organ/keyboard type tone.Step 6Find the Subtractor that is at the very top of the pile. On this subtractor turn up the volume all the way. Play a note on your MIDI keyboard. You should hear a very simple sine wave tone.If you do not have a MIDI keyboard you will find it useful at this stage to create a simple loop in the sequencer window, so that one note repeats itself – you will be able to use this to hear the changes you make to the sound without having to click on the on screen keyboard. This simple sine tone is going to be the base note for our sound, or the fundamental frequency. Download audio file (Audio Example 1.mp3) Step 7On the next Subtractor down turn the octave for Oscillator 1 up from 4 to 5. Now increase the volume up to about 85. You should now hear a higher tone joining your original tone when a note is played.Download audio file (Audio Example 2.mp3) Step 8On the third Subtractor down turn the octave control for Oscillators 1 up to 5, and the semitone control up to 7. Now turn the volume up all the way.This will sound like an extra note has been added to the sound, at an interval of a 7th. This is not what we want as we are trying to create the impression of one tone, rather than two or more. Lower the volume back down. When you get down to about 55 you should hear that the sound generated by this Subtractor starts to sound like a part of the overall tone rather than a note in its own right. Download audio file (Audio Example 3.mp3) Step 9On the fourth subtractor turn the octave up to 6, but leave the semitone control at zero. Again, turn up the volume so that you can hear this new layer to the tone but not so much that it stands out as a separate tone in it’s own right. Somewhere between 50 and 60 should be about right.Download audio file (Audio Example 4.mp3) Step 10On the fifth Subtractor in the pile turn the octave to 6 and the semitone to 7 – now bring the volume up like you have with the other devices. As we go further up the frequency spectrum and the overtone we add become higher and higher you will find that you don’t need to turn them up as loud as the lower pitched tones. This time leave the volume at about 40.Download audio file (Audio Example 5.mp3) Step 11For the sixth Subtractor we are going to put the octave up to 7 and leave the semitone alone. Remember that when we only change the octave control the tone we are adding is effectively the same note as our fundamental frequency, so you can sometimes get away with having these overtones louder than other, more discordant overtones.We are starting to get into the really high frequencies now, and the overtones we are adding at this stage will add some real brightness to the tone. I have decided to have quite a bright sounding organ tone, so I have left the volume for this Subtractor at 50, but you may wish to choose your own setting. Download audio file (Audio Example 6.mp3) Step 12This time we are going to push the octave up to 7 and the semitone to 7 again. This is another very bright overtone, so you can adjust the volume of it according to your taste. I have left it at 38.Download audio file (Audio Example 7.mp3) Step 13So far all of our overtones have been either the same note as our fundamental frequency, at different octaves or at an interval of a 7th, at different octaves. These intervals are nice and musical, and make for a pleasant sound, using other, more unusual intervals as our overtones can create more interesting and unusual sounds, but can sound out of key unless you are careful.As you get higher and higher up the frequency spectrum our ears find it harder to distinguish between different notes, and we can get more adventurous with our choice of interval without worrying so much about sounding out of key. As an example we are going to tune this last Subtractor to a more unusual interval. Turn the Oscillator 1 octave on the last Subtractor up to 9. Now turn the semitone control up to 1. We are now adding an overtone which is effectively just 1 semitone apart from our fundamental, only at a much higher octave. In many cases playing 2 notes next to each other sounds wrong, but as we are playing so high up this final overtone just adds more brightness, as long as it is not too loud. In this example I have chosen to set the volume at 38. Download audio file (Audio Example 8.mp3) You should now have a basic organ type tone, which you can play like any other instrument or combinator patch in Reason. This concludes Part 1 of the tutorial. In the next part we will look at how some modulation can make our patch sound more realistic, and how further modulation of the individual overtones can create different sounds, with almost limitless possibilities. |
|
|


Join The Community