Cubase 5 is Steinberg‘s MIDI sequencer and digital audio workstation for Mac OSX and Windows (now including 64-bit), retailing for around USD$500. The product has played an important part in the history of professional audio software, and has introduced many of the innovations in DAW software we take for granted today.
This article was previously published on the AudioJungle blog, which has moved on to a new format in 2010. We’ll be bringing you an article from the AudioJungle archives each week.The most controversial issue relating to Cubase is the use of USB dongles as a copy protection measure. Cubase forums often contain concerns from users about lost or broken dongles, others avoid the product altogether because of the dongle issue, and still others are intent on breaking the copy protection and have succeeded for most (but not all) versions of the program. Of course there are also many happy users of the program who don’t find the dongles a concern. Which camp do you find yourself in?
This is our eighth article in the series "Exploring Digital Audio Workstations". If you've missed the earlier articles, you can find them here:
- Exploring Digital Audio Workstations
- Discover Pro Tools LE
- 11 Essential Pro Tools Tutorials
- Discover Logic Pro
- 11 of the Best Tutorials for Logic Pro
- Discover Propellerhead’s Reason
- 18 Reason Tutorials That Cover All the Bases
History and Background
The history of Cubase begins with its precursor Pro 16 in 1984. It was a music program for the Commodore 64 and Apple II created by programs Karl Steinberg and Manfred Rürup in Hamburg Germany. The following year they introduced Pro 24 for the new 16-bit MIDI Atari STs, as well as an editor for the popular Ensoniq Mirage sampler.Cubase itself started life as a MIDI sequencer for the Atari in April 1989. It was released for the Mac platform shortly afterwards. Originally the program was called Cubit, but its name was changed for copyright reasons. It featured score editing, groove quantizing, macro sound editing, and a host of other features. It was also the first sequencer to use an Arrange Page, which listed the tracks vertically and timeline horizontally, and we are very familiar with today.
Cubase got into audio early—in 1991—with the release of Cubase Audio for Mac. Cubase Audio integrated both MIDI and audio in its Arrange window, and Steinberg also provided the stand-alone program Time Bandit for more detailed audio editing. Cubase for Windows was released the following year.
Cubase VST with FX plug-ins was released for the Mac in 1996 and Windows in 1997. Ataris were in decline, and the idea of sequencer/editor plug-ins was starting to catch on. VSTi’s appeared in 1999, and Cubase VST 4.1 offered a new rack for virtual synths.
In 2003, Cubase SX2 was released, incorporating Nuendo’s recently developed audio engine, and in early 2005 Yamaha purchased Steinberg, making it an independent company in the Yamaha Group. This year Steinberg turns 25, and Cubase 5 was unveiled at the NAMM Show in January.

Cubase 5 Features
Steinberg’s Cubase 5 Details page lists the following features:Composing and Sequencing
- The Key Editor allows entering, cutting, moving and transposing individual notes or whole chords, editing MIDI parameters, reworking a MIDI performance. With the In-place Editing function, you can also process MIDI parts directly in the Project Window in context with other tracks.
- The Score Editor is a notation environment that lets you view your music in the form of scores, with support for many symbol, display and editing options, lyrics and remarks, drum notes, guitar tablature and lead sheets.
- The Drum Editor is for constructing and reworking beats, rhythms and grooves as well as creating individual drum maps for every employed instrument.
- The List Editor gives fast access to every aspect of a MIDI note.
- MIDI plug-ins include Beat Designer, Arpeggiator, a MIDI pattern sequencer, a MIDI chord processor, a MIDI compressor and a Context Gate for selective MIDI data triggering/filtering.
- The VST Expression feature allows integrated editing of articulations, with full control over multiple articulations in the Key and Score Editors.
Recording and Editing
- The Steinberg audio engine delivers 32-bit floating-point resolution and 96 kHz sample rate.
- The Sample Editor provides a range of functions that cover common editing tasks right down to the sample level.
- The Control Room is a recording and monitoring environment with custom busses and setups for up to four studio sends for performers, full talkback and metronome integration, custom monitor setups and much more.
Mixing
- Three mixer views allow you to show specific combinations of channels, channel types and zoom.
- Cubase provides 256 physical inputs and outputs, 8 inserts per Channel, 64 FX sends as well as 256 groups/busses and unlimited routing between audio channels, busses, groups and FX returns.
- Automation handling provides a dedicated automation panel for quick access to all automation functions.
- Sidechain inputs are available on most VST3 plug-ins.
- Channel Studio EQ includes multiple filter modes and characteristics.
Effects
- Cubase 5 comes with 58 realtime effect processors, including EQ, Dynamics, Modulation, Reverb, Filters, Distortion and special effects.
Instruments and Content
- Cubase 5 delivers rich virtual instruments: LoopMash, Groove Agent ONE, HALion ONE, Prologue, Spector and Mystic.
User Comments
What do Cubase users think of the product? Here are some comments by users and reviewers that I found around the Net. I'd love to hear from you in the comments too.- “For first-time buyers looking for a complete production solution, Cubase 5 is up there with the best of ‘em, while for those coming from another DAW, features such as VariAudio and VST Expression are no doubt highly attractive.” (Musicradar.com)
- “Cubase 5-0 could have been a lot worse. In the balance, though, I am left with a positive feeling. The new features push Cubase 5 past the realm of sound recording and into sound developing. Lets face it, all sequencers record midi and audio, use plugins, soft synths, effects and allow you to mix and master. But what tools do they give you to create something new and different? LoopMash and VariAudio are a continuation of Cubase’s focus on audio manipulation. It appears to be finding its niche.” (TweakHeadz Lab)
- “For those with the cash, the full-blown Cubase 5 is more appealing than ever. Plug-ins aside, it no longer feels underpowered compared to Sonar, with VariAudio and Groove Agent ONE in particular filling some important gaps in its toolbox. As this old stalwart turns five once again, this time around we don’t envisage Steinberg going back to the drawing board any time soon.” (Ben Pitt, PC Pro)
- “The problem for Steinberg is that Apple’s own Logic bundle offers so much more, and costs around £200 less. For newcomers there’s no contest – even with the new features in Cubase, Logic still wins easily. For established users, the decision isn’t quite so easy. If you already have years of time and hundreds of plug-ins invested in Cubase, there’s every reason to want this update. And for the few hundred people in the UK who can score orchestral music with dots on staves, the articulation features may be a real time-saver compared to other packages.” (Richard Wentk, Techradar.com)
- “Introduced in 2006 to replace the SX/SL/SE designation, Cubase 4 was (and still is) viewed as a ‘lemon’ by many in the audio production world. In 2007, Steinberg tried to rectify the situation by releasing the Cubase 4.1 update. Although some of the bugs had been fixed with this update, there was still an alarming lack of DAW stability for Cubase users on both the Mac and PC platforms. For a music producer, there are few things more frustrating than a DAW that crashes repeatedly for reasons that are not fixable by the end user. With Cubase 5, Steinberg has put the instability issue to rest. Furthermore, there were some notable improvements made in Cubase 4 (such as the ability to change the order of channel insert effects via drag and drop and the introduction of instrument tracks) and all of those been carried over in Cubase 5.” (Clayton Warbeck, Suite 101.com)
- “No complaints out of the 4 years i have used cubase, big jump from the vst32 version with sx and then to the sx2, haven’t really felt the need yet to go to the 3.0 upgrade although i will just to stay on top of the game of this EXCELLENT program!!! Cubase should never be underestimated of it’s power and stability.” (Recording Engineer/Instrumentalist/Producer, Nashville)
- “The interface in Cubase has, for me, always been the best. I sometimes need to spend a few hours re creating MIDI lines with a pen tool and lining them up against the original audio. Cubase has such a liquidity in the screen, plus a cool targeting feature that seems to know just what and where you wish to edit, freely (not with quantization) lining things up to guide the eye while doing work with pin-point accuracy. That’s just one small but useful features I’ve always found so user friendly.” (Recording Artist, Engineer, Producer, London)
- “The programmers at Steinberg have obviously been doing their homework. In the world of mix and match PC components, it is surprising that this group designed a product that plays nice with almost any combination of components. Having looked extensively at Cubase user forums, I have seen so few complaints regarding hardware compatibility problems. Compare that with ProTools, which requires certain expensive add-on hardware to run well. Plus, the company seems commited to solving any problems that do crop up. The look is both funcional and aesthetically pleasing, plus it’s very modifiable. The adjustment options take into account an amazing array of possible configuration needs. Again, with earlier versions (including SX1), if you installed poorly written free plugins, the program would sometimes choke on startup, leaving you to figure out which plugin was jamming it up. SX3 manages to load right up no matter what. (It’s probably better to buy good plugins anyway, but…) I never worry about whether the program will make it through the boot process.” (Performer, Composer, Producer, New Orleans)
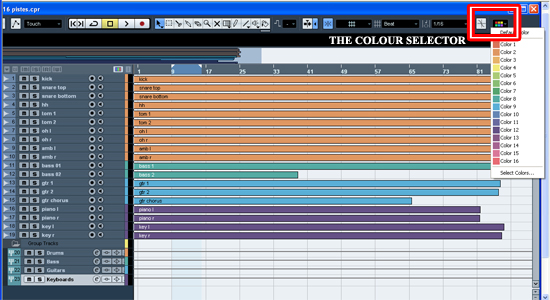
A friend brings you a multi-tracked session recorded with another DAW. Before diving in to the mix, send him looking for coffee and a newspaper, and take time to organize your project and optimize the work area. You will save time and gain in efficiency. Some say “Less is more.” Now let’s say “No stress, good mix!”Step 1: Import the Audio TracksBefore importing the audio files in the DAW, let’s have a look at those files. Are they WAV or AIFF? Are they OMF? The files’ format depends on the way your friend exported from his DAW.OMF (Open Media Format): When importing this file format, the DAW recreates the same project and puts all the audio files along the timeline in the proper order with the correct track names. Note that this file format does not capture effects data. WAV or AIFF: If the export of every track has been done with this file format, all the tracks have to start at the same point. Otherwise you won’t be able to line up the files at the same start point. Start with an empty project. Hit <ctrl + N>, select your project folder and hit OK. Under the menu File, select Import Audio file and look in your hard disk to select the bounces. If you import the tracks one by one, you will have to create an audio track beforehand. You can select all the tracks you need by holding the <ctrl> key on your keypad. At this point, make the good choice in the Import Option windows: 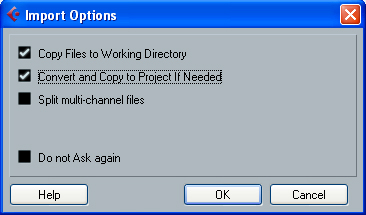 Import Options window Selecting “Convert and copy to project if needed” will convert the audio files to the same sample rate and record format you previously set in the Project Setup. Some Cubase users set the project at 32-bit floating point (adding extra 8 bits full of zero), arguing that all internal processing in the application are done at 32-bit floating point, which means there is no bit depth conversion during processing. The gain is not clear but the impact on the storage capacity is really clear! Selecting “split channels” allows you to decide if you want separate a stereo track to two mono tracks. The next window gives you the choice to insert the audio files on one track or insert on different tracks – select “different tracks”. 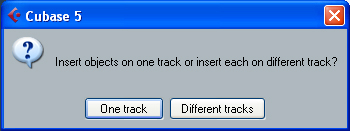 Insert objects option Step 2: Organize the TracksWe all remember our mother saying “Clean your room!” We thought she was wrong when we were young, but for a mix, she’s so right!Let’s have a look at the project: 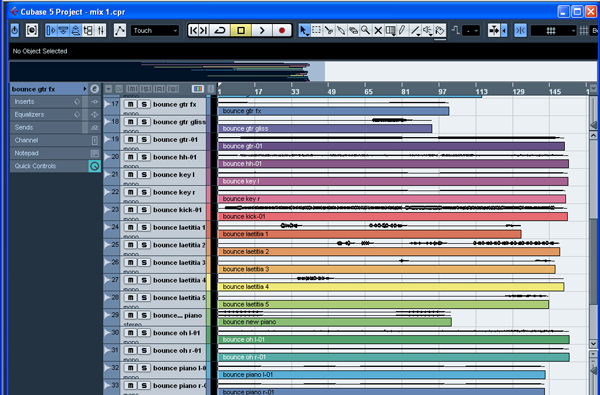 The Mix Project window Set all the audio tracks in the common order most of the front of house engineers use: First, all the drums tracks (kick, snare top, snare bottom, hh, toms and oh), then the bass tracks, then guitars tracks, then the ‘extra’ instruments (keyboards, strings…) and finished with the vocals tracks. To do so, drag and drop the kick drum track to the top of the track list. As you move a track on the track list, two green horizontal lines appear. Use the same technique with your project tracks. 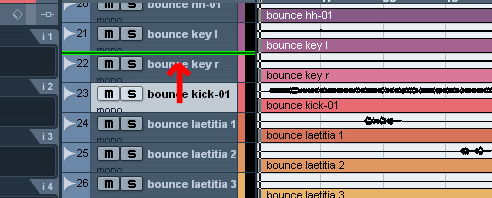 Drag and drop the track. Step 3: Rename the TracksTake the time to rename tracks as you want to. If there is only one kick drum track, why keep a track called “bounce kick-01″? Rename it “kick drum” for example. You just have to double click on the name in the track list to edit it.At the same time, if you want to rename the track in the event display, select the track, click the Show Event Info Line icon in the toolbar and double click on the name under ‘File’. 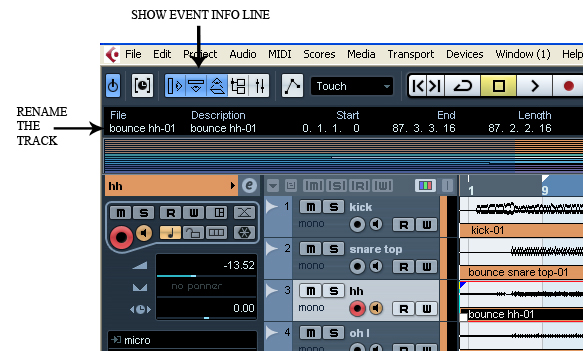 Rename the track. Step 4: Colorize the TracksYou should add some colors to your tracks for easier overview.You have two options:
 The colour selector. Step 5: Group Channel TrackUsing group channel tracks is very useful for mixing. By routing several audio channels to a group channel, you can submix them, apply the same effects and equalization to all of them. Let’s create these tracks and see the benefits.In this example project we have 10 drums tracks, 2 bass tracks, 3 guitars tracks and 4 keyboards tracks. So we create four group channel tracks. Do a right click in the track list, select “Add Group Channel Track”, set the count to 4, select Stereo and click OK. Rename the group channel tracks as ‘Drums’, ‘Bass’, ‘Guitars’ and ‘Keyboard’, set the colors of your choice (the same as the corresponding audio tracks or different one) and place these four group channel tracks at the end of the track list as it is physically placed on an analogue mixing desk. To route the output of an audio channel to a group, pull down the output routing pop-up and select the corresponding group. 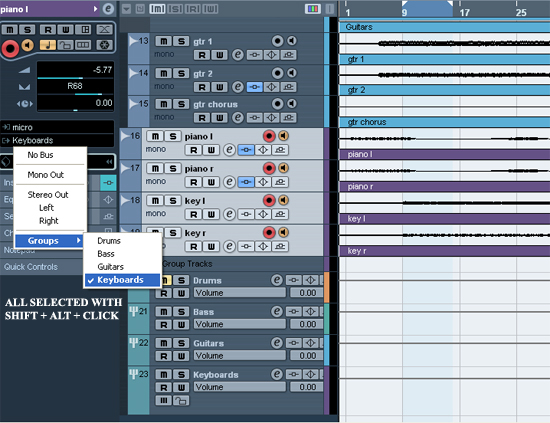 Group Channel Track Routing. Step 6: Solo a GroupIf you solo a group channel, all channels routed to the group will be automatically soloed as well. Soloing a channel routed to a group will automatically solo the group channel.Note that if you solo a group or channel routed to that group, any channels which have AUX sends routed to other group channels, FX channels or output busses will be muted. In the example below, the solo button on the drums group track has been activated. 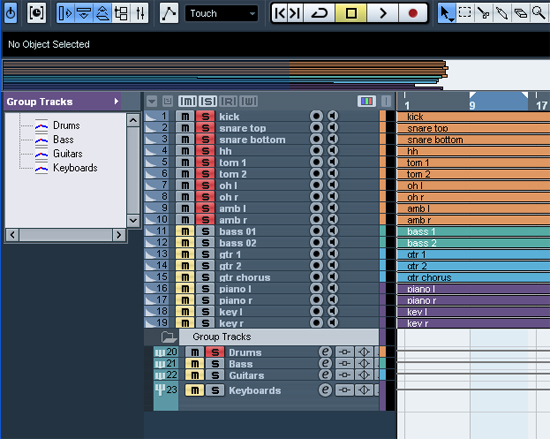 The drums group track soloed. Step 7: Mute a GroupIf you mute a group channel, all channels routed to it will be muted as well.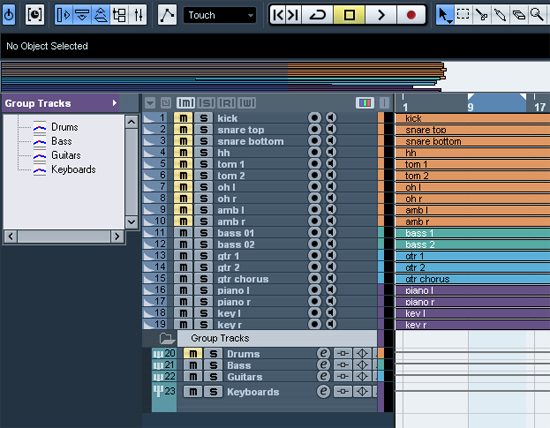 The drums group muted. 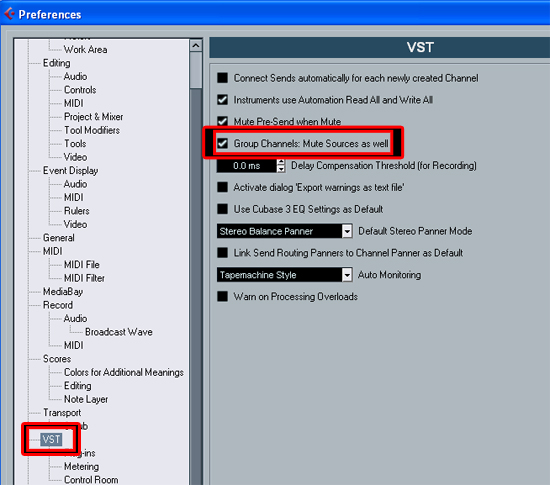 “Group Channels: Mute Sources as well” option. 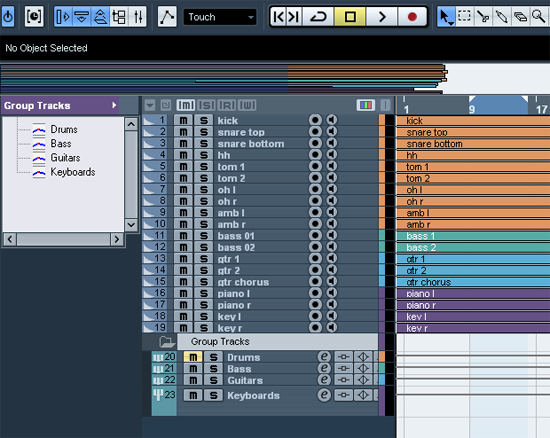 The drums group track muted (Mute Sources as well deactivated). I think you need more coffee before you can finally put your fingers on the mixer… |
Join The Community