Quick Tip: Add Rhythmic Variations with Gated Vocal Effects
July 22, 2010 at 4:21 PM
Gated Vocal effects are a cool way of adding extra rhythmic variations and dynamics to you tunes.
Especially, genres like progressive and psy trance make extensive use of those techniques enhancing the overall rhythm and adding a sense of spirituality, if you like. I am going to be showing you various ways of achieving this effect using Ableton Live 8.0.9 for this tutorial but the technique can easily be applied to any DAW.
Setting Up
I have two audio tracks, one playing a loop from one of my tunes and the other one a female vocal phrase.Listen to the drum loop:
Download audio file (back-to-basics.mp3)
Listen to the vocal:
Download audio file (vocal.mp3)
Using Clip Envelopes
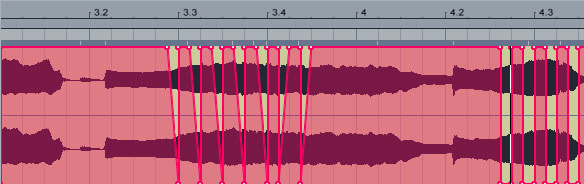
On the vocal audio file’s Envelope Editor select Clip from the Device Chooser, then Volume from the Control Chooser. Start drawing envelope steps in various quantization grid settings to modulate the clip volume. You can add varying envelope step heights depending on how much you want the volume being chopped up.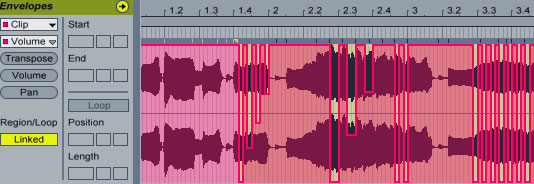
Download audio file (loop-vocal1.mp3)
Using a Sampler Device
You can achieve the same effect by using a Sampler device or any sampler on any other DAW. Drag a Sampler instrument on a MIDI track, then drag and drop the vocal sample clip on the Sampler where it says “Drop Sample Here”.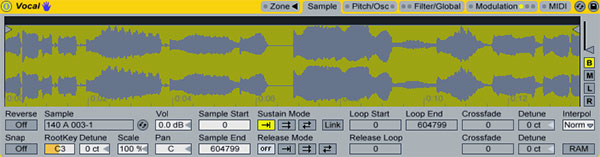

Listen to an example:
Download audio file (loop-vocal2.mp3)
Using a Simpler Device
For those that only have Simpler, they can still use the same method to process their vocals. Just activate the LFO and set similar values as before. The Volume > LFO depth setting is located at the right of the Simple device just underneath Volume.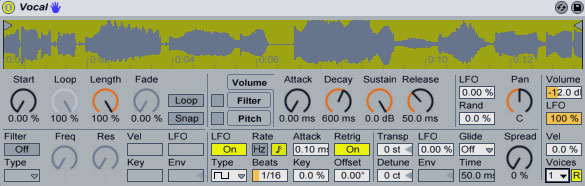
Using a Gate Device
Using a Gate device you can achieve similar results. You are going to need an extra MIDI channel so you can drop an Operator instrument (or any other instrument as a matter of fact) to act as the sidechain input for the Gate device. Remove the clip volume envelopes on the audio track we initially had from Step 1 and drop a Gate device. Open the external Sidechain input and select the Operator track from the drop-down list. Set the MIDI track’s Audio To to Sends Only to mute the Operator’s output and enter some MIDI notes inside a clip. When the clip is played any MIDI notes will activate the Gate sidechain making the vocal audible whereas no MIDI notes will silence the signal. For smoother volume changes, play around with the Attack setting on the Gate. I’ve added a bit of reverb on the vocal for some extra space.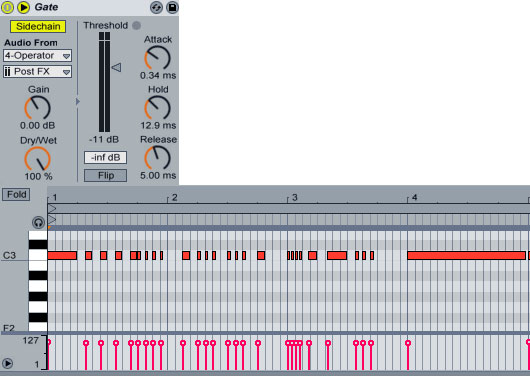
Download audio file (loop-vocal3.mp3)
Since, delay effects are also appropriate for this kind of thing, here is another sample with some delay added as well.
Listen to an example:
Download audio file (loop-vocal4.mp3)
Another thing you can do is create various MIDI clips with repeated 1/16, 1/32, etc length values and fire them up during a live performance to create varying rhythmic effects drawing only one long note to one of the clips so that you can switch back to the un-gated vocal sample. Or you can create a super rack where you can combine various parameters easily.
Media Files
back-to-basics.mp3 (MP3 Audio, 218 KB)
| How to Create & Use Custom Groove Templates in Logic July 22, 2010 at 3:04 AM |
| Groove templates can be very useful when making music, and Logic makes it quite easy for you to make your own and use them in your projects. However a little homework is required and there are a few tricks to doing it right. That’s what this tutorial is all about. I would like to mention that I am not going to provide the project file for this tutorial. If you do it right, this has to be done only once. So if I do include the project files, it would make the tutorial redundant. For the uninitiated, a groove template is made using a MIDI pattern that has been quantized with a certain groove. Therefore a prerequisite to this tutorial is that you have some other source for a “groove” at hand. For example a drum machine or a sequencer other that Logic (like Ableton Live). This may seem strange but there small differences in the groove quantization. I will be using Ableton Live to create the source MIDI files which we will later use in Logic. Again, you can use any sequencer or plugin that can add groove to MIDI sequences. (a plugin that can do this is GURU by fxpansion) Let’s get started. Step 1Open Ableton Live and create an Instrument Track. Now drop a “Simpler” instrument on the track and drop the “Click Attack” sample provided on Simpler (this is only for monitoring purposes). Double click in any cell of the instrument channel to create a MIDI region.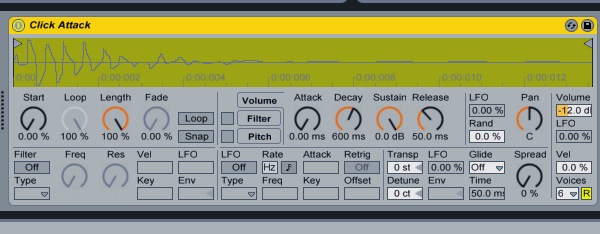 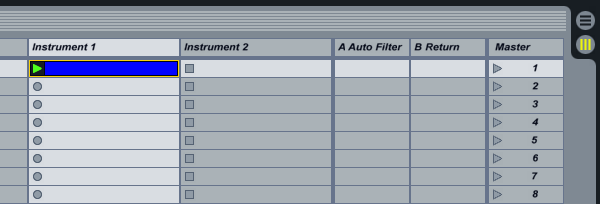 Step 2At the bottom left corner, right click/crtl click on the “1/16″ and select 1/8 in the popup menu to change the grid.You could use 1/16 notes too, but I’m sticking to 1/8 notes for the purpose of the tutorial. Once you learn how it’s done, you can create MIDI sequences with different grooves based on both, 1/8th and 1/16th notes. Step 3Now double click after the first grid line to create a MIDI note. In this case it makes no difference which note you are using since this has nothing to do with tone or pitch.Do this for all 8 divisions of the grid, or simply use the shortcut “Command-D” seven times (Ctrl-D in case of windows). Play the MIDI clip to hear how it sounds without any groove applied. This way it will be easier to hear the difference once you apply a groove to the sequence.  Step 4Once the notes are drawn, locate the “Clip” section towards the bottom left of the screen. (It’s right beside the “Status Bar”.) Here you will find the Groove drop-down menu and right next to the word “Groove” a small round “Hot Swap” button. Click the Hot Swap Button to reveal the Groove Library.Now you can see all the grooves from various sources that you can apply to your MIDI patterns within Live. Ironically there is also a folder of Logic grooves you can use in Live. For the purpose of this tutorial, we will chose the MPC folder which uses grooves generated using the legendary AKAI MPC sampler. (I suggest experimenting with the others later.) 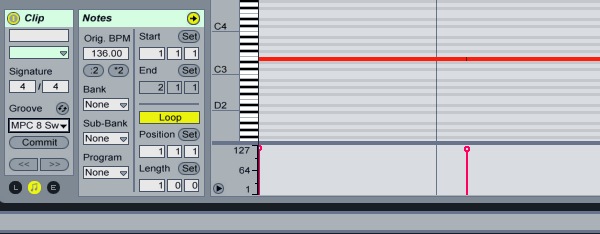 Step 5Now double click on any of the MPC 8 Swing grooves to hear how they sound with the pattern you created earlier. Experiment to hear what they sound like and make notes since you can make templates out of all the grooves that work well with your music.In the case of this tutorial, we will use the “MPC 8 Swing-60”. To apply the selected groove to the MIDI clip, click on “Commit” right below the Groove drop-down menu in the Clip section. The quantization will visually change on the right side to show the applied change. You should also be able to hear the difference. 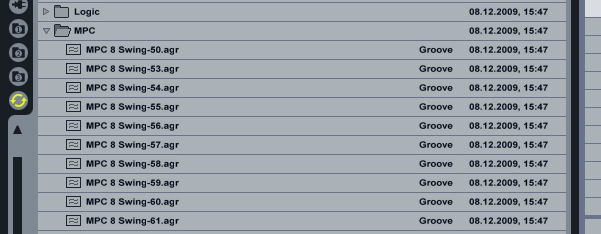 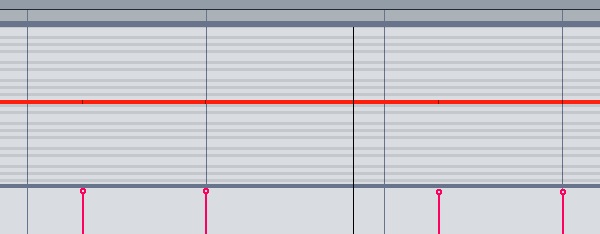 Step 6We now need to export this MIDI data so that it can be used by Logic. To do this, simply right click / ctrl click on the MIDI clip and select “Export MIDI Clip” in the menu. Save the file in an easily accessible location since it will be needed soon. I also suggest naming it depending on the groove used, for example: mpc8-60.mid. This will avoid confusion when using the files later.This process can be repeated for all the chosen grooves and also using the 1/16 grid. By the end of this you should have your own pool of usable MIDI grooves that can now be converted to Groove Templates in Logic. 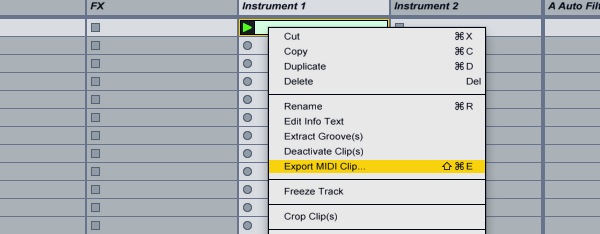 Step 7Once this is done it’s time to open Logic and start a new project. If you use a “Project Template” or “Autoload” in your workflow, I suggest incorporating the next part into the Template and saving it. If you do not use a template, now would be a good time to start. The reason for this is that Logic will not remember your groove templates across projects or even within the same project if it is not being used.Step 8Import or drag and drop all the MIDI files that you created using Live and organize them in the arrange window. Rename the tracks to exactly how you want them to appear in the Quantize menu before saving them as Groove Templates. Once the tracks have been renamed select all the MIDI regions that were imported containing groove information , right click / ctrl click on the selection, scroll down to “Name & Color” and chose “Name Regions by Tracks” in the sub-menu.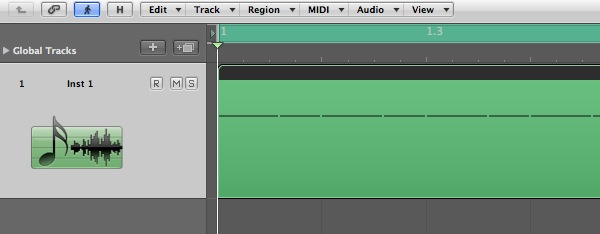 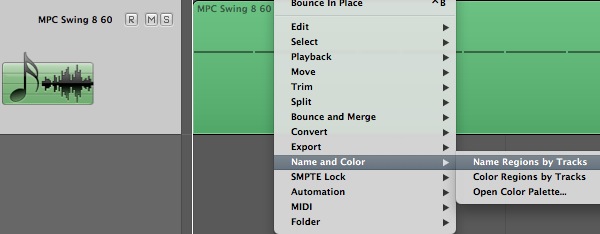 Step 9Finally we get to creating the actual groove template in Logic. This is a really simple step. Just select a track which has a MIDI region with groove information and in the “Inspector”, found at the top left of the page, click on the arrows next to “Quantize”.The menu that appears will have all the default logic quantization values and at the bottom of the list an option to “Make Groove Template”. Clicking one that adds the groove template to the list and it is ready for use. Using the templates is easy. Just click on any other midi track to which you want to apply the groove and go back to the quantization menu and select a groove from the list. The groove templates will also be available in the Piano Roll editor. 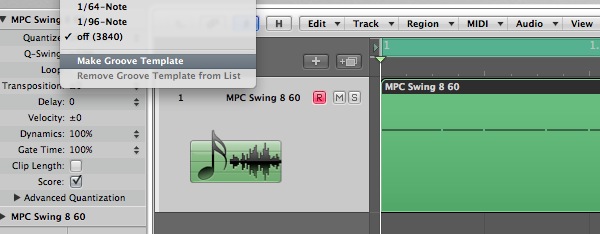 Step 10Now that we are done with the creation of Groove Templates, it’s time to clean up and organize. First of all, remove all the virtual instruments that were created on the instrument tracks when the MIDI files were imported. This is very important! You could also choose to not send them to the stereo output (by assigning them to “No Output”), but this is not essential.Step 11Select all the MIDI regions you used as groove templates and right click / ctrl click on the selection, scroll down to the last option in the drop-down menu and select “Pack Folder” from the resultant sub-menu. You may want to rename the folder at this time following the same steps as renaming a MIDI region.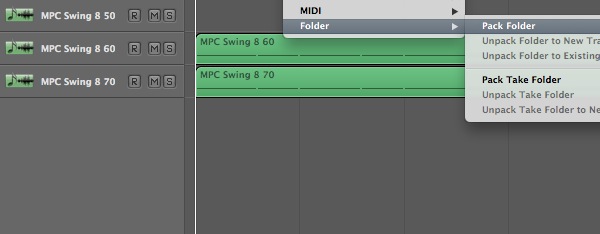 Step 12On top of the Arrange window, immediately to the left of the “Edit” button is a button with the letter “H” on it. Clicking on this button turns it green and reveals a smaller “H” button on all the tracks in the Arrange window. Click on the small “H” corresponding to the folder track containing the MIDI grooves. This will also turn green once activated. Now simply click on the larger “H” next to the “Edit” button and the track will be hidden from view in the arrange window. The button will also turn orange to indicate that the project has hidden tracks.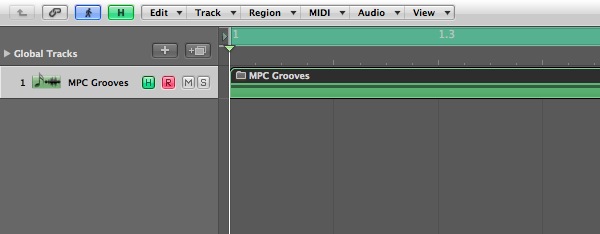 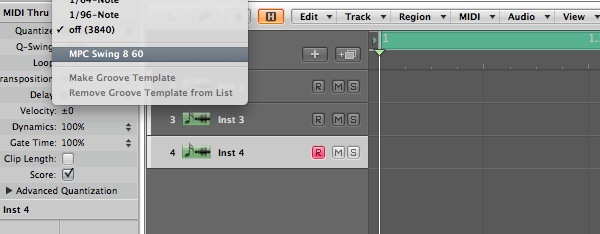 Step 13All that remains now is to save all this work. As mentioned earlier, those that started this exercise within their Autoload or Default Template should save it as a part of the template. For those that haven’t been using templates, save this project as a Template.By doing this, the Custom Groove Templates that were added to the Quantize list will appear on every new project. Have fun creating your own pool of Groove Templates for Logic. |
Join The Community