Win ACID Pro 7 At Hitsquad.com

Hitsquad.com has teamed up with Sony Creative Software to give Musicians the chance to win a copy of the full version on ACID Pro 7 worth $299.95.ACID Pro is a DAW powerhouse that combines full multitrack recording & mixing, MIDI sequencing, and the legendary ACID looping functionality. Whether you're producing full albums, or making beats, ACID Pro has the power and flexibility you need to get the job done.
Hitsquad is a major music software site, and are celebrating their 15th year online by running a series of competitions for musicians.
Competition details are available here.


How to Use Vocoders in Remixes
July 29, 2010 at 1:50 AM

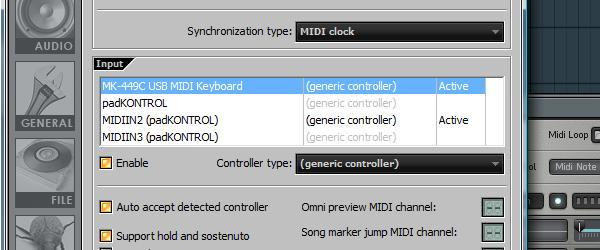
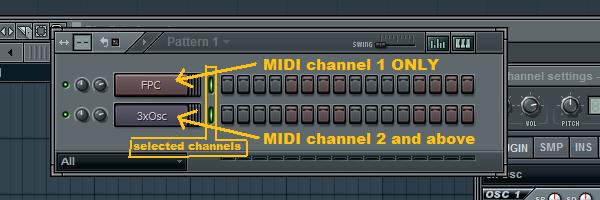
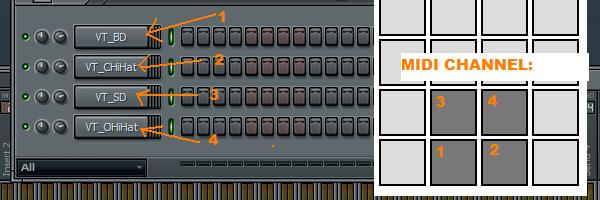
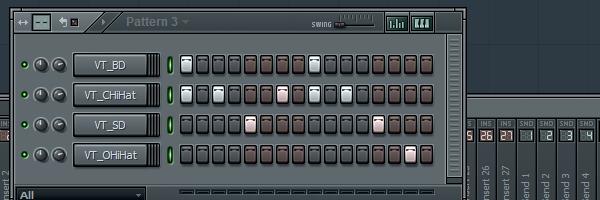
So maybe you’ve just been given a vocal part to remix and no matter how hard you try you just can’t get it to sit with your style of music. Maybe the progression is just too ‘light’ or perhaps you already have a piece you want to use. Whatever the reason, vocoding could really help you out in this situation.

I’ve used the vocoder thats bundled with Logic Pro 9 for this tutorial but as usual these techniques can easily be translated to other DAWs and essentially any other vocoder.

Step 1: The Original Vocal

Often when you a vocal part arrives as part of a remix project, it can be a challenge from the outset. If the timing, intonation or style clashes with your own then things have to be hammered into shape. Often this calls for some extreme processing.
A good few years ago I remixed Tears for fears for a major label and had this exact problem. My solution was to heavily vocode the vocal part. This meant it was still very much a part of my mix but the change in it’s musical progression meant that I was able to fit it around my work instead of me working around it.
Of course sometimes it’s easy to work around the vocal but this treatment can at least give you the option.
To avoid any messy copyright issues I’ve used a vocal phrase from Apple’s ‘Voices’ Jam pack. It’s maybe not the ideal example of a vocal remix part but it should work nicely for the purposes of demonstrating the technique.
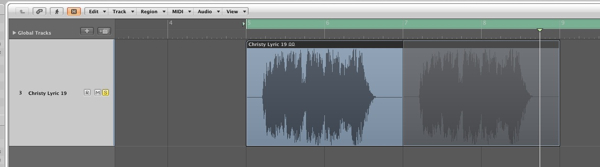
The vocal part we’ll be using.
Download audio file (1.mp3)
The vocal part.

Step 2: The Remix Concept

Let’s assume that at this stage you have already constructed a basic loop to use for your remix, or at least have an idea in mind. I have thrown something basic together, rather than develop an entire song.
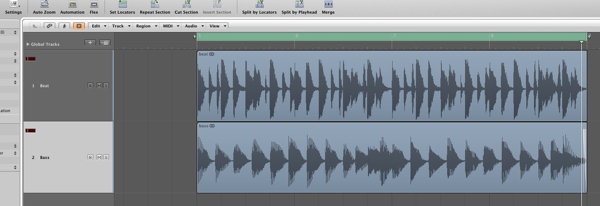
The basic remix concept.
Download audio file (2.mp3)
The drum and bass parts.
My idea currently consists of a drum loop and bass part. Even this simple combination has it’s own mood and musical progression. When the vocal part we have is added you can hear that it just doesn’t fit musically. The timing is correct but that’s where the good news ends.

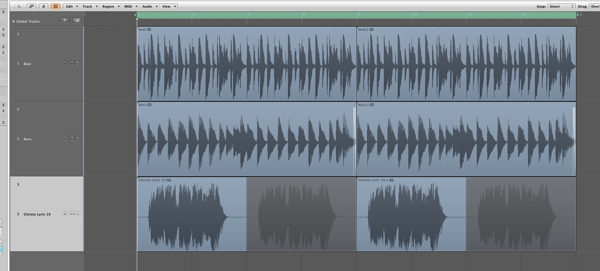
The loop and vocal at this point are not playing nicely together.
Download audio file (2b.mp3)
The raw, out of tune vocal.
An option here would be to write some musical parts to work with the vocal but sometimes you will want to stick to your own style. This is where the vocoder comes in!

Step 3: Enter … the Vocoder

This is the point where you can load up your favourite vocoder plug-in. There are loads of them about and many DAWs bundle them as standard. I was actually planning to complete this tutorial in Cubase but it appears that they have ditched their vocoder in version 5 / 5.5… So Logic’s stock vocoder it is!
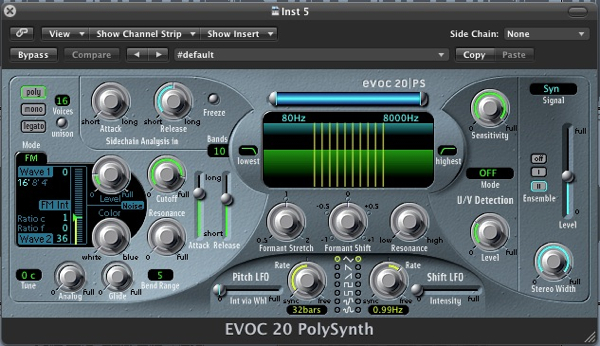
Logic’s vocoder.

Step 4: MIDI Routing

Most vocoders are treated by your DAW as instruments, as opposed to plug-ins. This means that you have to route MIDI and audio to them in order for them to produce sound. (These are traditionally known as the carrier and modulator.)
The audio we are feeding our vocoder with in this case is obviously the vocal. This is routed by using the instruments side chain input, in the top right. Once connected you are ready to start programming MIDI.

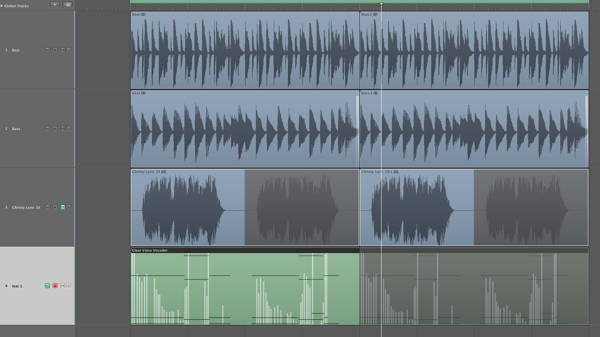
Routing the vocoders MIDI input is automatic.

Step 5: Recording a New Progression

MIDI routing is usually very straight forward and is often created when the instruments MIDI track is created. Ultimately this means you are good to go as soon as your vocoder is loaded and has audio being fed to it.
On a successful test of the connection I started to play a new progression. I picked something that worked well with my current loop but also allowed the vocal to be heard in full. In short match your chords placement to the vocal phrasing.

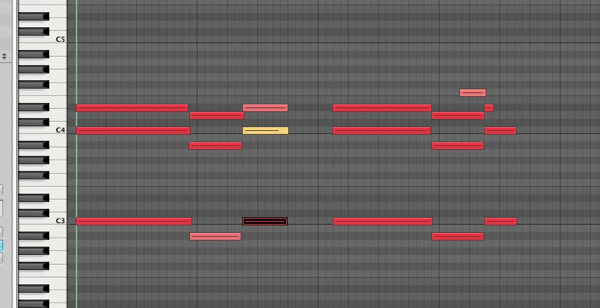
The new progression is recorded.

Step 6: Optimising the Vocoder’s Settings

If you are pretty new to vocoding it might be a good idea to start with a basic pre-set. Try to go for the most intelligible one you can find, this will ensure that as much of your vocal as possible is understood by the listener.

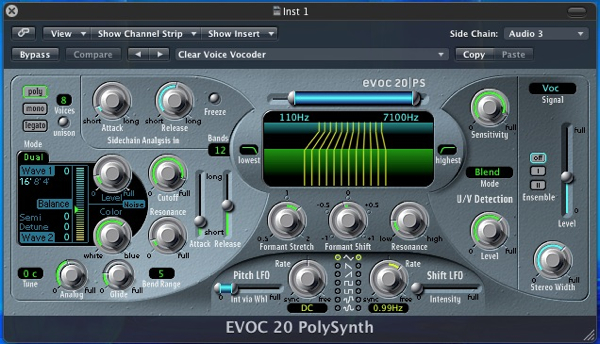
The vocoders settings get tweaked for clarity.
Download audio file (6.mp3)
The new vocal in isolation.
If you find that things need to be cleaned up further (as I did here) you can tweak things a little. I simply increased the amount of bands used, to produce a more refined, less grainy effect and also opened up the filters to ensure a nice bright sound was created. I also tightened up the vocoder envelopes a little.
Download audio file (6b.mp3)
The raw vocoded sequence with other parts.

Step 7: Adding Effects

Finally with my vocoder working satisfactorily and my musical elements in place I added a small amount of delay to the vocoded signal to open things up a touch and add some space. A compressor was also added to ensure that every part of the sequence was as up front as possible.
The final effect is obviously not a natural one but for electronic music it can be a really good way to include the vocal parts supplied but also stick to a specific style of production.
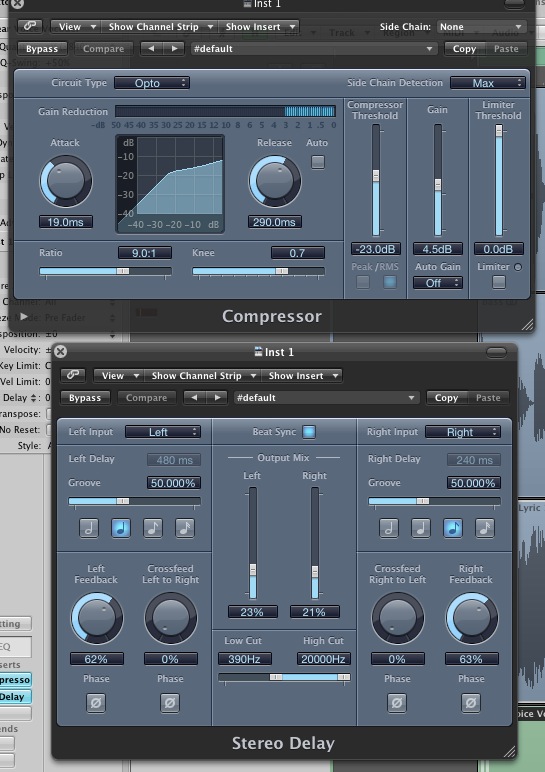
Compression and delay are added.
Download audio file (7.mp3)
The final result with some effects added.
Media Files
1.mp3 (MP3 Audio, 199 KB)

Quick Tip: Spice Up Your Drum Patterns With Reverse Hits

Using reverse drum hits is a great way to enhance a drum pattern or mix things up in an arrangement because it reuses the existing sounds, creates tension, and easily adds interest.
Download audio file (afReverseDrumHits.mp3)

Step 1: Starting Pattern

First, here is the pattern we’ll be starting with. It uses four sounds from the free Mafz Vol 2 drum pack Mafz Volume 2 Drum Pack: Kick 30, Perc 3 (which is a tambourine), Clap 14, Hat 13. These four sounds are also available in the playpack for this tutorial.
Download audio file (aaReverseDrumHits.mp3)

Step 2: Make Space

I should also mention that I pitched the tambourine sample down two semitones. For our first adjustment, we’re going to use a reversed tambourine sound that leads into the second clap. To make room for it, we’re going to need to remove one of the hats. Let’s also clone the pattern so that we can use the original pattern later.
Download audio file (abReverseDrumHits.mp3)

Step 3: Place the Sound

Now that we’ve made space, let’s drag the tambourine sound file into the playlist and reverse it, placing it roughly just before the second clap. Be sure to turn off your host program’s snap setting so that you can adjust it freely.
Download audio file (acReverseDrumHits.mp3)

Step 4: Volume Envelope

Sounds cool, but we can make it fit better into the pattern by using a volume envelope. In most circumstances, it’s best to not use the attack of the reversed sound, because this can lead to a double hit which sounds unnatural with short sounds, and with longer sounds it can “spoil the surprise” for the listener. There are a few ways to do this in FL Studio, but the easiest way is to use the clip’s menu and navigate to Automate > Volume.
This gives us an envelope to adjust the volume.
Download audio file (adReverseDrumHits.mp3)
Reversing tambourines works quite well, because it results in a believable sound, fairly close to what a tambourine performer could achieve.

Step 5: Reverse Kick

Another common way to use this technique is to place a reversed kick at the end of a pattern. We can do this following the same steps listed above.
Download audio file (aeReverseDrumHits.mp3)

Step 6: Reverse Hat

We can also add interest to the pattern by including a reversed hat. A volume envelope is not necessary for this sound, but you can add interest by panning it.
Download audio file (afReverseDrumHits.mp3)

Step 7: Arrangement

Lastly, let’s create a more interesting arrangement by switching between our starting pattern and our “spiced-up” pattern.
Download audio file (agReverseDrumHits.mp3)

Step 8: Reversed Cymbal

For the sake of completeness, I want to show the infamously overused reversed cymbal sound. The sound file we’ll be using is labeled as Hat 4 and is from the Smashing Music Drum Kit available on the Audiotuts free page (the file is also available in the playpack). I want to note that this technique can also be used with FX sounds such as risers and fallers, and that when an FX sound is reversed, a riser can become a faller and vice-versa.
Download audio file (ahReverseDrumHits.mp3)
Download the Play Pack for this tutorial (831 KB)
Contents
  • Samples
  • FL Studio Project

Media Files
afReverseDrumHits.mp3 (MP3 Audio, 104 KB)


The Art Of Music Production – Part 1 – Audio Premium


The Music Producer's Handbook: Music Pro Guides (Technical Reference)In this week’s Audio Premium content, Bobby Owsinski starts a new series on music production inspired by his new book “The Music Producer’s Handbook” and his decades of experience in the industry.

To learn more about what you get as part of Audio Premium, read this. To take a peek inside this tutorial, hit the jump!
A new book of mine just came out called The Music Producer's Handbook, so I thought this might be a good time to go over some basic production techniques while the topic is still fresh in my mind. Music production is sort of a black art because the very nature of the job is nebulous in many people's minds, but we'll try to clear that up in this series.

Table of Contents

  • What is a Producer?
  • How to Become a Producer


    • The Musician/Producer
    • The Engineer/Producer
    • And The Other Way
    • You Still Need A Client
  • Elements of Music Production


    • Creative
    • Financial
    • Politics
    • Project Management


You Can Check Out Bobby Owsinski's Work By Clicking Here

Quick Tip: Using Multiple MIDI Controllers in FL Studio 9

Everybody loves MIDI controllers. They’re so much fun, some people buy a few of them. Before version 9, FL Studio used all connected MIDI controllers to control only one channel, but now each one can be configured to control something completely different.

Step 1

Plug in and set up your MIDI controllers. Make sure the inputs are enabled in FL Studio’s MIDI settings and everything is working properly. I’m going to be using my Evolution MK-449C keyboard and a Korg PadKontrol.

Step 2

Add the instrument channels you want to control with each MIDI controller. I want to control some drums with my PadKontrol and a bass sound with the keyboard, so I’ve added FPC and 3xOSC channels.

Step 3

Now we can configure the MIDI controllers and the channels in FL Studio so that each channel is controlled by a seperate controller. When multiple channels in the step sequencer are selected, the MIDI channel that each note is sent on determines which channel (each instrument in FL Studio, like the 3xOSC and FPC, is called a ‘channel’, it’s confusing) it controls, from the ones that are selected. So, when 16 channels in FL Studio are selected, the first channel responds to MIDI notes sent on MIDI channel 1, the second on channel 2 and so on.
The MIDI channel is part of the note on and note off messages sent by the controller. When we set up a controller to send notes on MIDI channel 1, it doesn’t tell FL Studio that it’s being operated on channel 1, each note message just happens to be on channel 1. In the case of the PadKontrol and many other controllers, we can send notes on any MIDI channel we want. Knowing these limitations, we can predict how FL Studio will respond to different MIDI channels.
For example, let’s select 2 different channels in FL Studio’s step sequencer. FL Studio doesn’t know how we’ve configured our MIDI controllers or what MIDI channels we might be using. Any notes on MIDI channel 1 will be sent to the first channel in the step sequencer. Notes on MIDI channel 2 get sent to the second channel, as do any notes on any of the remaining MIDI channels.

Step 4

Read the manual for your MIDI controller to find out how to determine and change which MIDI channel(s) it’s operating on. My PadKontrol sends all notes on channel 10 by default, because in prehistoric times, channel 10 was always used for drums. My keyboard is set up on channel 1 by default, so this works out well. If the keyboard used any other channel, I would have to change it to channel 1, as any notes on channels 2 and above will get sent to the second selected channel in FL Studio. Since the PadKontrol is sending notes on channel 10, the FPC channel should be below the 3xOSC channel in the step sequencer. Selecting it (by clicking the little green light next to it’s name) and pressing Alt+ Up or Down Arrows will move it up and down.

Step 5

Now with both the FPC and 3xOSC channels selected by right-clicking the green lights next them, the PadKontrol plays the drums while the keyboard plays the bass. If you have a friend, this is a great way to collaborate.

Extra Step 1

Let’s revisit the PadKontrol to do some really amazing things with this. Each pad can be configured to any MIDI channel, so with a bit of planning, multiple drum sounds can be triggered at the same time with just Sampler channels and no FPC or Layers. I’ve set up 4 pads sending notes on MIDI channels 1-4. To make things a lot easier, I’ve set each pad’s note to C4, which FL Studio sees as C5. This is just so that there’s no weird pitching going on.

Extra Step 2

If you’re having fun with this, go into FL Studio’s MIDI settings window and click the ‘Record to step sequencer’ button. Now, if you play a cool beat on the pads, FL Studio will record each hit right into the step sequencer and it can easily edited from there. Whoooa!


Open Mic: Tell Us About the Microphone You Use the Most
July 26, 2010 at 2:31 PM

Which microphone do you actually use the most?

Each Tuesday we open our mic to readers and lurkers alike to come out of the woodwork and tell us your thoughts and opinion, your experiences and mistakes, what you love and what you hate. We want to hear from you, and here’s your chance.

You may have a collection of microphones in your arsenal, or be starting out with just one. Which microphone do you use the most, and why?
This might not be your best mic, or most impressive mic. It’s the one you find yourself turning too more often than the others.


20 Killer Background Music Tracks on AudioJungle
July 26, 2010 at 6:42 AM

You’ve almost finished your killer presentation. You’ve chosen an effective template and communicative fonts, and tweaked the design just right. You’ve fine-tuned your wording and rehearsed your delivery. But something is missing. You need killer audio to add atmosphere to your killer presentation. Where do you get it?
Our sister site AudioJungle.net is an abundant source of royalty-free stock audio. Google reports that many people go there searching for “background music” every day. You’ll also find audio tracks in many other categories and genres. Have you checked it out?
It’s a great place for musicians, composers and music producers to call home, earning a decent residual income on the tracks you upload there. To find out more about becoming an AudioJungle author, check their Sell Your Work page. You’ll meet a bunch of current authors below. If you’re already an AudioJungle author, give us a shout out in the comments, and leave a link to your profile page.
And it’s an amazing place to visit when looking for stock audio. All submissions are checked for quality by our careful reviewers, so you won’t find any rubbish. And prices start from $1 (though the tracks reviewed here cost a little more). In this article we’ll list 20 of the best tracks you’ll find when searching the site for “background music”.
For a presentation you’ll want some music that conveys the right atmosphere and ambiance without distracting the listener from the voice over. In fact, you may want a selection of tracks that take the audience on a journey. Let us know in the comments which of the 20 is your favorite, and the types of stock audio you need for your current projects.

Soundroll


  • alt
    Soundroll (Dmitri Lifshitz) is a freelancing sound engineer who also plays synth in the metal Yiddish band “Gevolt”. He does post production, for commercials, adverts and corporate videos, and also composes for music libraries. He is one of AudioJungle’s most successful and popular authors. Read more, see photos and check out his gear in the AudioJungle interview.

1. Desert Night

Cost: $10
This dark Arabian/Oriental track features great percussion, a flute and pad sounds, and has great ambiance and atmosphere.
Download audio file (preview.mp3)

2. Chilling Mood

Cost: $12
This track is a bit more up-tempo, featuring electronic piano, synths and acoustic guitar. It will add character to a presentation, but you wouldn’t want to have to speak over it.
Download audio file (preview.mp3)

Leto


  • Leto (Tomislav Letinic) is a composer and music producer based in Croatia, and has been making music for over ten years. Check out his AudioJungle interview here.

3. Easy House Background

Cost: $8
This track will bring a modern feel to any presentation. The volume remains at a constant level, and will be well-behaved behind a voice-over. It features synth, soft rhythm and bass.
Download audio file (preview.mp3)

4. My Dream (With Vocal)

Cost: $10
This track has a great corporate flavor, and features female vocals which sit nicely in the background. A version without the vocal is also available.
Download audio file (preview.mp3)

Tomh


  • Tomh (Tom Howe) is a young composer based in England with a love for writing for orchestra. He has won a Royal Television Society award for his work. Read more in his AudioJungle interview.

5. Jazz Cafe

Cost: $12
A great Jazz track featuring piano, upright bass and subtle drums. It has a carefree sound, and loops well.
Download audio file (preview.mp3)

Visualgroove


  • Visualgroove (Febby Tan) is a web designer, graphic artist and drummer. She has been producing music from the age of 14, and believes the most important ingredient is to put your heart and emotion into it. Check out her AudioJungle interview for more.

6. Flow

Cost: $7
Another corporate tune, which is designed not to distract when a voiceover part is placed over it. It loops seemlessly, and has a “relaxing feel with positive energy.”
Download audio file (preview.mp3)

AudioQuattro


  • AudioQuattro is a freelance composer and audio engineer, working as a producer for both TV and radio stations. He is based in Berlin.

7. Clouds

Cost: $12
This motivational pop track sits in the background nicely where it belongs, and is suitable for a variety of project types.
Download audio file (preview.mp3)

8. Relief

Cost: $12
Low pads dominate this piece, with synth and mellow piano figures adding to the rhythm.
Download audio file (preview.mp3)

Vaisnava


  • Vaisnava is a music producer based in the US, creating music for their own meditation, healing and fun.

9. Simple Piano Background

Cost: $10
An atmospheric piano background designed for multimedia projects.
Download audio file (preview.mp3)

10. Ambient Background Talkover Bed 2

Cost: $12
There are lots of soothing pad chords in this track. “This is meant to play softly in the background of your works… Perfect for commercials, broadcast radio, audio backgrounds and talk overs.”
Download audio file (preview.mp3)

ADG3studios


  • ADG3studios (Adrien Gardiner) is a composer, musician, and all-around nice guy based in Canada, and also AudioJungle’s community manager.

11. Jazzypack2 Kitchen Showroom

Cost: $7
A quiet piano background with accompaniment. “A nice and pleasant jazzy loop using a bossanova progression with piano melody and melodic guitar support, reminiscent of furniture and appliance displays, at least I think so, or for whatever else you might think it would suit.”
Download audio file (preview.mp3)

Audioaddicted


  • Audioaddicted is a music producer based in California who previously worked on video games and multimedia projects.

12. Atmosphere

Cost: $12
A relaxing track featuring sparse piano, thin drums, mellow bass, and filtered synth pads.
Download audio file (preview.mp3)

BMovier


  • BMovier is based in Italy. His byline is “Scoring music for your guts.”

13. Background Loop

Cost: $10
A funky mid-tempo track suitable for presentation and multimedia projects as background music. The instrumental progression follows a series of cool instruments including saxophone, vibes and electric piano.
Download audio file (preview.mp3)

DL-music


  • DL-music has been an AudioJungle author since February 2009, and currently has three tracks in his portfolio.

14. Be Calm

Cost: $8
An ambient loop featuring tremolo electric piano and sax, accompanied by a subtle rhythm track.
Download audio file (preview.mp3)

Solidbeats


  • Solidbeats (Stefan Gustafsson) is a Swedish composer who has been with AudioJungle for years, and produces music in a wide variety of genres.

15. Smoove

Cost: $10
A smooth and laid back R’n'B groove featuring electric piano. “Ideal as background music, easy to loop and fade out with minor skills when it comes to editing audio.”
Download audio file (preview.mp3)

Slats


  • Slats (Andy Slatter) is a guitarist based in the UK who has been producing music for more than quarter of a century. He is also an AudioJungle audio reviewer, and an author who has contributed 11 tutorials to Audiotuts+.

16. Ambient Website Background Sound Pack

Cost: $14
“A full length ambient website background track, which is also broken down into it's sub parts, 10 variations to allow the user to re-arrange into a custom built track or use the individual parts on different parts of a website/movie. The variations are subtle, so there is a nice flow between each part, but there is enough change in feel to create a nice feeling of build, from the sparse delay driven acoustic guitar and percussion intro to the full pad swells and electronic drums.
Download audio file (preview.mp3)

Musicant


  • Musicant is a graphic artist and music producer based in the Ukraine.

17. The First Kiss

Cost: $12
“Easy, light music which bears in itself positive emotions.” It features a guitar melody, and will sit in the background of a presentation nicely.
Download audio file (preview.mp3)

Flashleap


  • Flashleap is a multimedia designer who composes in his free time.

18. Soothing Guitar Background Loop 2

Cost: $8
“A must for those who want a soothing background music for any project use. Guitar is used as the main instrument, with drum and a bit of chill aspect as the background creating an mellow and soothing mood which is relaxing and easy listening.”
Download audio file (preview.MP3)

Plastic3


  • Plastic3 (Alexander Polishchuk) formerly wrote songs for a number of leading Russian artists, and now concentrates on electronic, dance and edgy orchestral music for Film and TV productions. He is based in Europe.

19. Energetic Background Pack

Cost: $27
This pack contains five full electronic tracks which contain many different instruments and emotions.
Download audio file (preview.mp3)

SoundProdigy


  • SoundProdigy is a web developer and graphic artist based in Europe.

20. Good Luck

Cost: $10
An up-tempo corporate motivational track with a guitar groove and violin/strings melody.
Download audio file (preview.MP3)
What types of stock audio files do you need for your projects? Which of the 20 tracks above did you enjoy most? Are you interested in becoming an AudioJungle author? Let us know in the comments.