Competition Rules

The rules are simple:

I have uploaded two basslines, the first one is the dry version and the second one has got effects on it. All you need to do is to listen to both and tell me what eq settings I used (what did I cut or boost) on the second one. Don't worry about how much I have cut or boost just tell me the frequency.

For example, maybe you might say there is a cut at...and there is a boost at...

and you have to tell me which other plugin(s) I used. You don't have to tell me the settings of the other plugin(s).

All you have to do is to leave a comment below to answer and stand a chance to win the plugins. And remember to comment using the same name you used when filling the form on my blog, so that I will know where to send the plugins. If your answer is correct but you commented as anonymous, you won't get the price, I will give it to someone else. To write your name look for "comment as" then select "name and url" and enter your name, and click the preview button before posting the comment.

The Competition Ends 25 September 2010

If there's anything you don't understand you are more than welcome to ask your question in the comment section.

Bass #1 by Nytshade

Bass #2 by Nytshade

Good Luck And Don't Cheat :D!!!

This site works perfect with firefox internet browser you can download it here Spread Firefox Affiliate Button


Click The Image To Enlarge it!

I've uploaded a picture to make everything easy, because there are some people who don't understand music production language. As you can see in the picture there's a boost at 92MHZ, a cut at 245MHZ, another boost at 4.2KHZ, a low cut at 50MHZ and another cut at 15KHZ. There's also a subtle amount of compression and if you take a look at the send channel you will see that there's also a small amount of distortion.

So since no one got the correct answer I will give it the person who was close enough. It was really difficult to choose the winner. It was between Lewis.72 and Jonas Sorensen. I chose Jonas Sorensen because he included the High and Low pass filters.

Congradulations to Jonas Sorensen, I will be contacting you soon.

Thank You Here Are Your Free Downloads


Additive Synthesis in Reason

This tutorial will show you how you can create an additive synthesizer using a combinator in Reason. Additive synthesis is one of the less common forms of synthesis in use today, but it can be used to create some great sounds. Furthermore, following this tutorial is a great way to improve your understanding of some of the fundamental principals of sound and synthesis in general.

Step 1

The first step is to understand what we are trying to achieve in this exercise. If this seems overly complicated or confusing don’t be put off, the actual exercise is relatively simple, and should make things clear as you follow it through.
Additive synthesis is a method for building up complex tones from simple ones. Most sounds we hear in the real world, for example a piano or a guitar are not just simple, linear wave shapes like a sawtooth or a square. They are in fact made up of many complex overtones, all at different frequencies and layered up over a ‘base’ or ‘fundamental frequency.
A sine wave is a wave shape that has very few harmonics or overtones, and is essentially only the fundamental frequency of whatever note or frequency it is pitched to play. By layering up many sine waves we can artificially create the effect of a complex harmonic tone, with complete control over each individual overtone or harmonic in the sound.

Step 2

Now we are ready to begin. The first thing we need to do is to build a combinator patch which will allow us to generate a large number of sine waves at once, from a single key press or MIDI note trigger. For this we will need a combinator. After creating a combinator in your Reason file, create a full size (14:2) mixer inside the combinator, and then create a subtractor synthesizer.

Step 3

We now need to program the Subtractor to generate a simple sine wave. Firstly initialize the patch on the Subtractor. Once this is done change the wave shape on Oscillator 1 to a sine wave shape. Open the filter all the way and turn the volume all the way down. Turn the velocity>filter freq knob to the neutral position. Your patch should now look like this:

Step 4

We will need a lot more than one sine wave generator to create a complex tone, so now create an additional seven subtractors inside the combinator. Once you have done this right click on the top one (the one where we edited the patch to generate a sine wave) and select ‘copy patch’. Now paste this patch onto each of the other Subtractors by right clicking on each in turn and choosing ‘paste patch’. You will now have a combinator with 8 Subtractors inside it, each with the same simple sine wave patch.

Step 5

Our basic template is now complete. You should now save the combinator patch at this point so that you can easily return to this stage and start experimenting with different additive synthesis sounds. We can now et into the meat of the exercise and begin generating our tones. For the first tone I am going to create a soft organ/keyboard type tone.

Step 6

Find the Subtractor that is at the very top of the pile. On this subtractor turn up the volume all the way. Play a note on your MIDI keyboard. You should hear a very simple sine wave tone.
If you do not have a MIDI keyboard you will find it useful at this stage to create a simple loop in the sequencer window, so that one note repeats itself – you will be able to use this to hear the changes you make to the sound without having to click on the on screen keyboard.
This simple sine tone is going to be the base note for our sound, or the fundamental frequency.
Download audio file (Audio Example 1.mp3)

Step 7

On the next Subtractor down turn the octave for Oscillator 1 up from 4 to 5. Now increase the volume up to about 85. You should now hear a higher tone joining your original tone when a note is played.
Download audio file (Audio Example 2.mp3)

Step 8

On the third Subtractor down turn the octave control for Oscillators 1 up to 5, and the semitone control up to 7. Now turn the volume up all the way.
This will sound like an extra note has been added to the sound, at an interval of a 7th. This is not what we want as we are trying to create the impression of one tone, rather than two or more. Lower the volume back down. When you get down to about 55 you should hear that the sound generated by this Subtractor starts to sound like a part of the overall tone rather than a note in its own right.
Download audio file (Audio Example 3.mp3)

Step 9

On the fourth subtractor turn the octave up to 6, but leave the semitone control at zero. Again, turn up the volume so that you can hear this new layer to the tone but not so much that it stands out as a separate tone in it’s own right. Somewhere between 50 and 60 should be about right.
Download audio file (Audio Example 4.mp3)

Step 10

On the fifth Subtractor in the pile turn the octave to 6 and the semitone to 7 – now bring the volume up like you have with the other devices. As we go further up the frequency spectrum and the overtone we add become higher and higher you will find that you don’t need to turn them up as loud as the lower pitched tones. This time leave the volume at about 40.
Download audio file (Audio Example 5.mp3)

Step 11

For the sixth Subtractor we are going to put the octave up to 7 and leave the semitone alone. Remember that when we only change the octave control the tone we are adding is effectively the same note as our fundamental frequency, so you can sometimes get away with having these overtones louder than other, more discordant overtones.
We are starting to get into the really high frequencies now, and the overtones we are adding at this stage will add some real brightness to the tone. I have decided to have quite a bright sounding organ tone, so I have left the volume for this Subtractor at 50, but you may wish to choose your own setting.
Download audio file (Audio Example 6.mp3)

Step 12

This time we are going to push the octave up to 7 and the semitone to 7 again. This is another very bright overtone, so you can adjust the volume of it according to your taste. I have left it at 38.
Download audio file (Audio Example 7.mp3)

Step 13

So far all of our overtones have been either the same note as our fundamental frequency, at different octaves or at an interval of a 7th, at different octaves. These intervals are nice and musical, and make for a pleasant sound, using other, more unusual intervals as our overtones can create more interesting and unusual sounds, but can sound out of key unless you are careful.
As you get higher and higher up the frequency spectrum our ears find it harder to distinguish between different notes, and we can get more adventurous with our choice of interval without worrying so much about sounding out of key. As an example we are going to tune this last Subtractor to a more unusual interval.
Turn the Oscillator 1 octave on the last Subtractor up to 9. Now turn the semitone control up to 1. We are now adding an overtone which is effectively just 1 semitone apart from our fundamental, only at a much higher octave. In many cases playing 2 notes next to each other sounds wrong, but as we are playing so high up this final overtone just adds more brightness, as long as it is not too loud. In this example I have chosen to set the volume at 38.
Download audio file (Audio Example 8.mp3)
You should now have a basic organ type tone, which you can play like any other instrument or combinator patch in Reason.
This concludes Part 1 of the tutorial. In the next part we will look at how some modulation can make our patch sound more realistic, and how further modulation of the individual overtones can create different sounds, with almost limitless possibilities.


Quick Tip: Tempo Control Automation in Session View in Ableton Live
August 24, 2010 at 9:22 PM
Like all DAWs, Ableton Live allow users to automate the tempo and signature of a given set. Unlike other DAWs, Ableton Live incorporate the session view where tempo changes can be automated there as well by renaming the Scene names accordingly. We are going to examine various ways of achieving this and also another way of automating tempo between two values by using external software.


Automating Tempo by Renaming Scenes

Till now, we know that by properly renaming Scenes in Ableton Live we can cause the tempo to jump to our desired value. Scenes can be renamed by clicking on a particular Scene in Session View, then hit CTRL(CMD for Mac)+R then type in the new name. Scene names can be both descriptive and functional; if Live detects a viable tempo and/or time signature as part of a scene name, the project will automatically adjust to these parameters when the scene is launched. To assign a tempo to a scene, select the scene and rename it with a viable tempo (e.g., “96 BPM”). Any tempo can be used, as long as it is within the range allowed by Live’s Tempo control (20-999 BPM).
To assign a time signature to a scene, rename the scene with a meter in the form of “x/y” (e.g., “4/4″). Any time signature can be used, provided it has a numerator between 1 and 99 and a denominator with a beat value of 1, 2, 4, 8 or 16. Tempo and time signature changes can coexist within a single scene name, and can appear in any position as long as they are separated from each other by at least one character. For example, “2/4+102 BPM”, “112 BPM;7/8″ and “110 BPM Verse 3/4″ are all scene names that will cause simultaneous meter and tempo changes.

The renamed Scene above, when launched, will cause the master TEMPO to jump to 108BPM with a signature change of 2/4.

Using Dummy Clips to Gradually Automate Tempo Control

The “problem” with this method is that the master tempo jumps to the required BPM. What if our live set incorporated a slow gradual tempo change? We know that we can easily achieve that in Arrangement View but there seems no way to do that in Session View.
We need to make use of dummy clips and external software. Dummy clips are essentially empty midi clips that contain modulation information for other parameters in our Live set. The extra software we are going to be using is a free software called MIDI YOKE. MIDI YOKE is a MIDI Patch Cable driver. It’s a Windows multimedia driver that allows you to connect the MIDI output from one program to the MIDI input of a different program. Mac users already have this functionality in the form of the IAC driver.
Once downloaded and installed head over to Live’s preferences in the Midi Sync tab. Under Midi Ports activate Remote for the Input In From MIDI Yoke: 1 port. Activate Track for the Output: Out to Midi Yoke: 1 port.
Exit Preferences. Create a midi track and set it’s output type to Out To MIDI Yoke: 1. Leave Output Channel to 1. Midi Yoke allows you to utilize all 16 midi channels if so desired.
Double click on an empty clip slot to create a dummy clip. On the Clip View hit the E icon to show the Envelopes Box. Leave the Loop switch activated. From the Envelope Editor’s first drop down box(Device Chooser), select Midi Ctr and from the second(Control Chooser) select a parameter controller. In my case, I chose 50. Set the Loop Length to the bars, beats and sixteenths that you want your automation to last. In my case, I set it to 4 bars.
Now, please, pay attention as it may seem a little bit tricky. On the red line representing the envelope’s control automation, create two breakpoints one at the beginning and one at the end setting the first one to 0 and the second one to 127.
Launch the dummy clip by hitting the Clip Launch Button, then press SPACE bar to stop. Activate Midi Map Mode, click the tempo at the right of the TAP button(make sure to click the left side of the number where the Coarse value of the tempo is located) and click space bar again to launch the dummy clip. Hit the space bar once more to stop the clip. On the Midi Mapping at the left, you can see that the CC 50 controller number has been assigned to the master Song Tempo. Change the min and Max values to 60 and 187 values respectively or any other values whose difference is 127(for instance 100 and 187). Obviously the range you choose should cover the values you are planning to use to complete your automation. Exit Midi Map Mode.
The reason we set our range as such is that it will allow us to have whole number increments on the Master Tempo instead of decimal ones. As you know, the breakpoint envelope values range from 0 to 127 so setting a min and max Song Tempo values whose difference is 127 while on Midi Map Mode, allows us to work in single unit increments of the song tempo.
Now, let’s say we wanted to execute a gradual tempo from 100 to 120 BPM. All we needed to do is subtract the value of min value of 60 from both values and adjust our breakpoints accordingly.
Remember that you always subtract the min value you have set while on midi Map Mode, so if your range had a minimum value other than 60, this value should be used for subtraction.
Now you can deactivate the Loop switch for the dummy clip, launch it and see the song temp gradually increasing from 100 to 120 BPM in the duration of 4 bars! This way, whenever you want an automation change like that in your live set, you can create similar dummy clips and launch them either on their own or as part of a Scene launch.
Let me know if you have any questions and thanks for your time!


Making the Beat: Afro-Cuban Drums – Audio Premium
August 24, 2010 at 5:06 AM
In this week’s Audio Premium content, Mike Elliott continues his in-depth series on creating drum beats. This week we explore how to create Afro-Cuban drum patterns in your DAW.


Welcome to the second drum based tutorial in the series that will show you what the beats are and how to make them sound good. In this tutorial we are going to cover drums in the Afro-Cuban style.
Afro-Cuban music is one of the two main categorizations of Latin music; the other being Brazilian. The drums are one of the key components in this style of music and knowing which beat to insert is crucial.
If you ever wondered what the difference was between a rumba and son clave, or just want to add some Afro-Cuban flavor, this tutorial will enlighten you in all regards. Since our previous discussion involved how to construct various beats from smaller elements, this tutorial will do so as well; albeit in a slightly different way. So my friends, lets mambo!
Here’s the kind of music you’ll be able to create once you harness the knowledge inside:
Download audio file (example.mp3)

Table of Contents

  • 1. Setting Up


    • What You Need
    • What to Use
  • 2. Learn the Dance


    • What the Steps Mean
    • Pick a Clave any Clave
    • Review
  • 3. Bell Beat Baby


    • Palito and Cascara
    • Mambo
    • Songo
    • Review
  • 4. Add the Flair


    • Bombo
    • Toms
    • Reinstating the Clave
    • Review
  • 5. Sound Color


    • The Kick
    • The Snare
    • The Cymbals
    • Toms
    • Review
  • 6. Fills, Fills, Fills


    • The Accent
    • Lead In
    • Patchwork
    • Review
  • Afro-Cuban in Review

Beginning with the End in Mind: A Basix Guide to Mixing

So where do you go now? You had a song. You recorded all the parts. You even added in some additional overdubs and vocal harmonies. Now all your tracks sit there in your software program waiting for your next move.
You managed to record all your tracks pretty decently and they really sound good, each in their own right. But when everything is playing back all at once, it just really seems overwhelming. All your tracks competing for the same space. Some instruments are louder than others and they all seem to standing in the same place shouting for your attention. It’s time to start mixing.

But where do you start? Where do you go? Where does everything belong? In the following Basix tutorial I’m going to go into the absolute basics of mixing a song. Nothing fancy, just the building blocks of mix engineering.
Let’s do some construction analogy. If you want to build a house, you don’t start with the fancy chandeliers and swanky kitchen interior. You start digging out for a foundation. If you are an architect you you probably don’t start off by designing the Sagrada Famila, you start off by designing simple houses and structures (and if you actually are an architect I welcome you to your new hobby…). Similarly, with mixing, we don’t start off with fancy reverb mixing tricks or complex side-chain triggering. We start off with the Basix.
Pareto’s principle is as follows: 20% of the work results in 80% of the outcome. Sounds pretty nice doesn’t it? What this means is that if we use just a few simple mixing guidelines, and given that the tracks were recorded well, we end up with almost a perfect mix without having to resort to complex modulation effects and automation.
I’m not saying that you shouldn’t familiarize and understand the more advanced mixing techniques out there, but for the purpose of starting a mix we don’t want to think about that. It’s like when you have too much on your to do list and because you don’t know which task you should start on you end up doing none of them. So by starting with an idea of where you want to go, it’ll be easier to get there. Begin with the end in mind, follow a path instead of getting lost in the woods.

And What Are the Basics Actually?


  • Levels – Volume, mate. Volume. Some things belong in the background, some things stay at the forefront.


  • Panning – Stereo anyone? I know everybody will say that you should check your mix in mono and all that, but that doesn’t mean stereo panning isn’t hugely important for spreading things out.


  • Compression – Here is a visual, text based representation of a sentence that could use some compression. If I wErE tO wRiTe WitH TOO mUcH DYNaMic RaNge It WOULD be HarD To rEAd. So by compressing certain parts we keep them at a steady level that doesn’t waver too much in dynamic range. Of course, some instruments need less compression than others, but understanding compression and using it correctly is key.


  • EQ – Problematic frequency ranges, dull instruments, tinny guitars and boxy drums. This can all be fixed with EQ. It is the No. 1 mixing tool you use to sculpt your mixes.


  • Depth – If you are a one man band, you can play a multitude of instruments in the exact same place. If you are a band with multiple instruments and players, they are going to be scattered around a room. There is a reason drums are usually positioned behind the singer at a concert. It’s because the drums aren’t supposed to be in the front. By using processors such as reverb and delay we can create depth and space in a mix, and making it sound like there is actually a band spread out on stage.
Those are the basics. These are the mixing techniques and concepts you need to be most familiar with in order to succeed as a mixing engineer. Many of these concepts intertwine and can be used together to create more complex mixing tricks but having an understanding of each one helps you see how they react to each other.

Basic Misconceptions and Questions

1. Basic Levels in the Digital World

On a side note, before you start mixing at all, be sure to check your levels regularly. If you are mixing something that will ultimately make it to a mastering engineer, be sure to allow for sufficient headroom on the master buss. Turn all your faders down to zero and when you start putting up the volume of the individual faders it’s a much better idea to keep the fader levels low but the master volume of your interface or monitors louder.
If you start mixing and down the line you see your master buss peaking and not having any headroom, select all the faders and lower all the levels until you see the master buss showing normal levels. You want the peaks to always be below -3dB, and lower is better. Use a multi-meter or level meter of some sort on the master buss to see the peak level and the average RMS level.

2. Levels of the Drum Kit

For example, let’s start with the drum kit. We want the kick drum nice and juicy so we throw the fader all the way up and go to work on it. Chomp, chomp. A little bass boost there and some EQ and that compression ratio is good and bam, we’ve got it! Nice and punchy kick drum. Now let’s add the snare, and then the bass and we need the space around the drum kit so we add in the overheads. Ah… now the kick drum sounds a little buried. We’ll just push the fader up a little more, that’s it. Much better.
Now we add the guitars and vocals and keyboard stabs and suddenly our bass guitar needs more volume so we add more gain to the compressor. Ah… but now it’s getting in the way of the kick drum, so we need to add more volume to that fader. But wait – we can’t push it up any further. What should we do now?
Mixing isn’t about adding more volume to each element until you’ve balanced them off. It’s about balancing the volume of instrument in a certain volume area. You don’t have an endless amount of headroom in your software, so rather than pushing up the faders until they can’t go any farther you should mentally define a specific area of the faders where you need them to be balanced.
Like I said before, aim for the master buss to be at most at -3dB peaks, and therefore you need to mix the rest of the instruments much lower on their own respective faders. It’s a simple math problem: 10 instruments at a high volume equal a really hot master fader, but 10 instrument with the same balance but a lower level equal a manageable master fader.

3. Who Are the Middle Men?

When panning, some things belong in the middle, and some things can be spread out in the stereo spectrum. Anchor elements such as the lead vocal, snare, bass and kick drum should usually be squared off in the middle, tying all the other elements together.
The snare drum is the defining element of the drum kit, supplying the steady backbeat. Therefore you want all that energy to be in the middle, driving the song forward.
The main vocal is the center of attention, and thus must be placed in the center in order to shine as much as possible.
The kick drum and bass are foundation instruments that give the track a solid grounding, and by placing them in the center you lay the groundwork for all the other instruments on top, to the sides and up above.

4. Bass-ic Panning

The reason the bass drum and bass guitar are usually panned to the center is because of their low frequency content. Since they have so much power in the bass frequency range it can often screw up the phase perception of bass instruments if you pan them out of the center.
If one speaker has more bass information than the other, it can easily screw up your low end. That’s why it’s usually a good idea to anchor them in the middle, giving each speaker the same amount of bass to work with. Also, since it’s hard to pinpoint where low frequencies are coming from, it’s best to keep them in the middle.
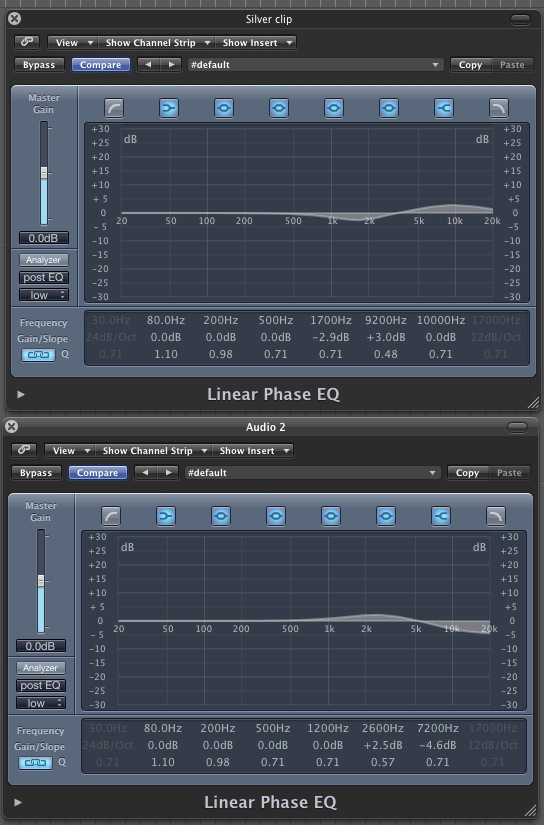
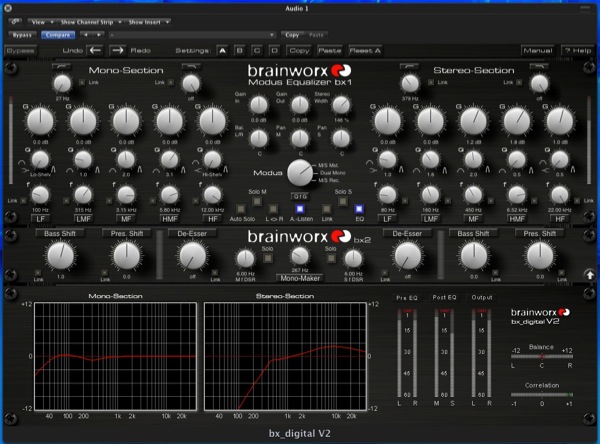
5. Why EQ? – Or EQ for EQ’s Sake

Like I said before, EQ is your greatest friend. EQ is to the engineer what the paintbrush is to the painter and is the most crucial tool to shaping the way you want your mix to sound.
However, many beginners slap an EQ on everything and twiddle the knobs aimlessly, thinking that just because there is some EQ on the mix it must sound better. Believe me, I used to be this guy, looking at my audio program and fiddling with all the Hertz, thinking I was making it sound better when in reality I didn’t have a clue.
EQ, even though you can experiment with the various cuts and boosts and frequency ranges is best used when you have a basic understanding of where you are going. Listen to each instrument or sound objectively and think what it might need. Does it lack some punch or is it ill defined and bassy?
Before you even slap an EQ plug-in on your track, think about what you want the finished track to sound like. There are certain frequency areas that have specific sounds.
Bottom line? Don’t EQ for EQ’s sake. Although it’s great to experiment, I do feel that a general understanding of the inherent characteristics of frequencies is vital for efficiently EQing your tracks.

6. Compression Before EQ or the Other Way Around?

I’m going to assume that you don’t know that it matters which processor comes before another. Depending on which processor comes first, it will interact differently to those that come after.
Guitar players know that putting an overdrive pedal before their distortion will sound different than putting a distortion before the overdrive. The are two different effects and the result will either be a distorted overdrive signal (which usually sounds fuzzier), or an overdriven distortion, which can sound harsher and chunkier (and in my book way better).
If you put a compressor before an EQ it will first even out the dynamics of the signal, flattening it if you will, and then you can apply EQ to a more stable signal; whereas adding EQ before compression and boosting various frequency ranges will result in your compressor being more sensitive to those boosted area.
Here is a general guideline: If are going to drastically EQ, boost a lot and so forth I would recommend applying compression before the EQ. But if you want to compress drastically but only clean up the EQ a little bit you can apply the compression after the EQ. Think about what you are going to be doing with each processor and then experiment.

7. Compression for Compression’s Sake

I was recently mixing a few guitar tracks. These guitar tracks all sounded really great in their own right, crystal clean and sparkling with just a hint of tube overdrive to give them that bluesy warmth.
I thought to myself that these were pretty decent guitar tracks and they didn’t need any processing, just some tiny buss compression to make them sound more like a whole. But when I grouped all the guitars to one track and was going to apply a little compression I accidentally started off with a preset that added way too much compression, at least number-wise and what I was seeing on the meters. But what I was hearing was a whole different story.
For some reason, that compression push shone a light to all the little nuances of the guitar playing, making it sound even better than I ever would have thought. The only downside was because the compressor was squashing the signal the noise floor was much too close for comfort, as you could hear the hiss from the guitar amp. But the beautiful pro outweighed the hissy con, so I kept it that way.
Moral of the story? Accidents happen, and sometimes they can sound beautiful. And sometimes you might need to compromise a little audio fidelity for a better sounding performance. If you compress too much you raise the noise floor of the signal, but in this case the little extra noise was bearable.

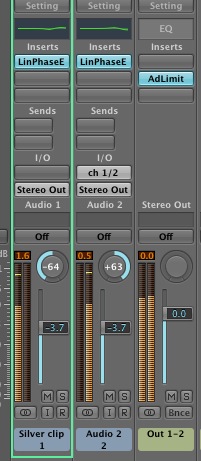
8. Are You Making These Time-based Effects Mistakes?

Here’s a nugget of wisdom: Don’t use time-based effects such as reverb and delay as insert effects. Huh?
Let’s separate them. Inserts are the processors you put directly onto a track, such as a compressor or EQ that you want to change the ORIGINAL source. Bus effects, effects returns and sends are all part of the jargon when you SEND a COPY of your signal that you have already processed with INSERT effects (EQ, Compression) to a separate bus, or auxiliary track to be effected in some way with TIME-Based Effects.
EQ and compression don’t add any delay or shifts the signal in time in any way. They change and process the original in real time. But time-based effects are used when you want to reproduce and add a separate, delayed (or reverbed or chorused or flanged) signal alongside the original source.
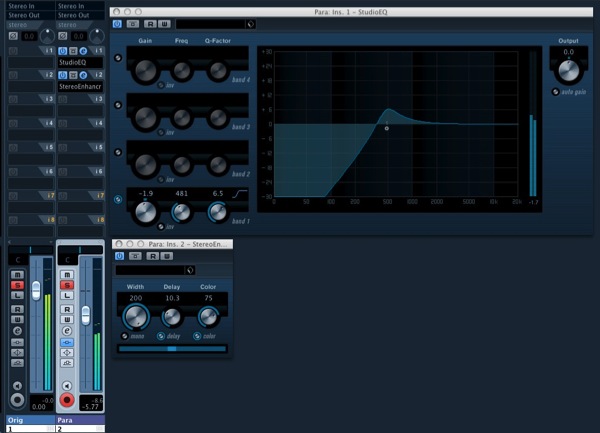
Now, using time based effects is a great way to add extra space to your mixes, thicken up an instrument or give a part a different character. And, just like with EQing before compressing and the other way around, it matters which time based effect comes first. Modulation effects have shorter delay times (around 30ms) but delays can have much longer times.
Lastly, reverb is more of a “space” creator than a signal repeater. Adding delay before reverb, for instance, will delay the reverb from starting but putting a delay after a reverb will repeat the reverb sound.
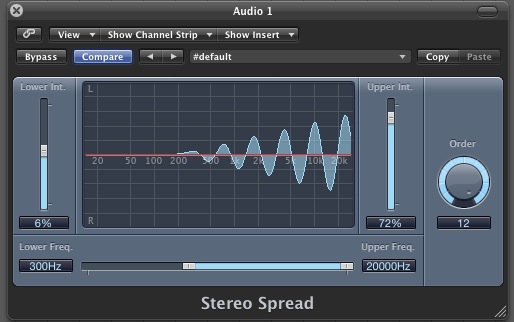
9. Deep and Dry

Now, depth. How do you achieve depth? Without depth it’s like having everybody stand a the exact same distance away from you and trying to talk to you at the same time. Who are you going to listen to then?
The same happens when you have a mix without depth. Elements might not be occupying the same stereo space since you’ve already panned them around, and they might not be at the same volume, which is one way of achieving a certain level of depth. Obviously louder instruments sound relatively closer than quieter ones, but the still kind of sound like they are equidistant from each other.
 You think about levels and EQ as up and down, panning as left to right but reverb, delay and effects as front to back.
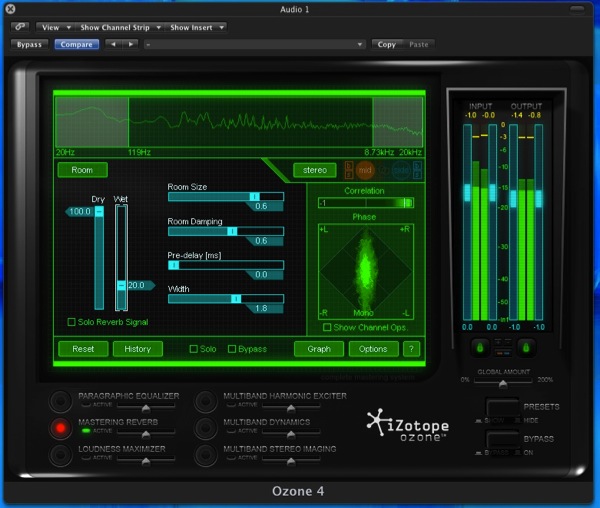
You need to apply space to your instruments to create a sense of 3D, or depth to your mixes. If you are sending a certain instrument to a reverb you can leverage the amount of depth you want by leveling off the dry (original signal) with the wet (reverbed signal). If you have much more of a really wet reverb in your mix than the actual instrument itself, it will sound further away. By adding more of the effected sound you are essentially drowning it, or pushing it into the space you have created with your reverb.
Of course, you can still achieve depth without drenching your mixes in reverb, and that’s where we come back to leveling off our wet and dry faders. You can add a roundness and space to an element by adding some reverb but keeping the reverb in background. By adding some reverb here, more there and even more to these parts you are positioning your elements front to back. Kind of like placing chess pieces on a chess board.

Conclusion

Do you remember how cool that scene was in Minority Report where Tom Cruise just flung computer windows across the screen with his hands? Throwing some profile that way, opening up a new one and deftly placing it somewhere else in one fell swoop? Or that scene in Iron Man II where he strips apart that virtual model to find the blueprints of an unknown element? That’s what I would like mixing to be. If you could just surround yourself with all the instruments in a virtual reality setting and you could just place them front to back or left to right depending on what you needed.
Think about that next time you are struggling with finding where your mix is going. Think about where you want your elements to be from the start and then try to manoeuvre them into position as deftly and swiftly as possible. Knowing the basics of where you want to go, using the fundamental mixing principles that you learn at the beginning you can put your mix into a desirable position as quickly and as easily as possible. Only then can you try out all the other advanced mixing tricks.

Discover Ableton Live

Ableton Live is a digital audio workstation available both for Mac OSX and Microsoft Windows. It differs from other DAWs in that it is designed for live performance as much as music production. This also makes it a valuable tool for DJs.
Ableton explains: “Live’s nonlinear, intuitive flow, alongside powerful real-time editing and flexible performance options, make it a unique studio tool and a favorite with live performers. If you’d rather be ‘making music’ than just ‘using music software,’ Ableton Live is for you.” The program was first released in 2001, and version 8 came out in April of this year. An LE version is also available.

  1. Exploring Digital Audio Workstations
  2. Discover Pro Tools LE
  3. 11 Essential Pro Tools Tutorials
  4. Discover Logic Pro
  5. 11 of the Best Tutorials for Logic Pro
  6. Discover Propellerhead’s Reason
  7. 18 Reason Tutorials That Cover All the Bases
  8. Discover Steinberg's Cubase 5
  9. 20 Instructive Cubase Tutorials
  10. Discover Cakewalk's SONAR
  11. 14 Tutorials that Make Using SONAR a Piece of Cake
Now let's have a look at Live.
Ableton Live 8 screenshot

History and Background

Ableton was founded in Germany in 1999 to create their own unique computer-based music-making solution, and released Live to the world in late 2001. This year they released their eighth version of the program – a major upgrade.
From 2007, Ableton have been collaborating with Cycling ’74, producers of Max/MSP, a visual programming language for music and multimedia. Earlier this year they announced the result of their collaboration, “Max for Live”. This product makes it possible to create Max/MSP patches directly inside of Live, making it even more flexible and extensible then before.
In this video, Ableton explain what Live is in 60 seconds:

Live’s Features

The Ableton Live 8 page on Ableton’s website lists the program’s features.
Key features:
  • Multitrack recording up to 32-bit/192 kHz
  • Nondestructive editing with unlimited undo
  • Powerful and creative MIDI sequencing of software and hardware instruments
  • Advanced warping and real-time time-stretching
  • Supports AIFF, WAV, MP3, Ogg Vorbis and FLAC files
  • A comprehensive selection of built-in audio and MIDI effects
  • Built-in instruments: Simpler for sample-based synthesis, Impulse for sampled drums
  • Instrument, Drum and Effect Racks
  • New groove engine; apply and extract grooves in real time
  • VST and AU support; automatic plug-in delay compensation
  • REX file support plus built-in audio to MIDI slicing
  • Video import and export for scoring, video warping
  • Simple MIDI mapping plus instant mapping for selected hardware
  • Full ReWire support; runs as Slave or Master
  • Single-screen user interface for simple, creativity-focused operation
  • Multicore and multiprocessor support
Other distinguising features:
  • Session View
    Live is the only music production software with the “Session View”: a unique grid for recording and playing musical ideas and phrases. The Session View is non-linear, so you can record and play back your ideas in any order. This view gives flexibility when recording and freedom to improvise when performing.
  • Arrangement View
    Live also has a second view: the “Arrangement View,” a complete music production environment. This is the linear counterpart to the Session View and is well-suited to “traditional” recording, arranging and mixing. These two views interact with one another, each with its own strengths and intricacies.
  • Uninterrupted creative flow
    In Live, you never have to stop the music. Record audio and MIDI on the fly, drop in loops and samples, add effects and swap sounds without ever hitting the stop button: everything happens in real time. You’re free to improvise and the computer actually becomes a musical instrument—an expressive and creative tool, perfectly at home on stage or in the studio.
  • Drum Rack
    Live’s unique Drum Rack combines drag-and-drop simplicity in a familiar pad-style interface. Each of the 128 drum pads can have its own instrument or sample plus effects. Slice beats, loops or REX files to MIDI for additional control options and use the new groove feature.
  • Creative expression for DJs
    Mix and match tracks and loops automatically, remix on the fly, capture audio loops in real time from decks and other external sources, incorporate your own productions into the mix.
  • Sharing and remote collaboration
    Share your Live Sets with others via the web. One-click sharing and loading, a simple system of setting access permission, speedy transfers and no issues with external plug-ins and instruments.
  • Looper
    Not only for guitarists, the Ableton Looper gives you classic sound-on-sound looping without the limitations of a hardware device. Looper is set up for remote operation, so you can record, overdub, undo and more without touching the computer.
  • Broad compatibility
    Live works seamlessly with controller hardware and assigning custom MIDI controls is simple. Live supports AIFF, WAV, MP3, Ogg Vorbis and FLAC files, VST and AU effects and instruments. Live can handle REX files and runs as a ReWire Master or Slave, so it works nicely alongside other DAWs like Pro Tools, Logic, Cubase or Reason. Live also supports multicore and multiprocessor systems.

User Comments

What do Live users think of the product? Here are some comments by users and reviewers that I found around the Net. I'd love to hear from you in the comments too.
  • “If you produce music for media, or don’t have many instruments already, then Suite offers a massive saving over buying the component elements separately, these being the Essential Instrument Collection, Sampler, Operator, Drum Machines, Session Drums, Analog, Electric, Tension, Latin Percussion, World Class Library and Collision… Live 8 isn’t perfect, though. Some of the new features haven’t been implemented as well as they could’ve, and there are things we’d still like to see (multi-screen support, for example). We’ve also been experiencing more crashes and audio glitches than with previous versions when adding plug-ins (though not when performing with a pre-prepared set, which is the main thing). Hopefully, this will be resolved with an update.” (Musicradar.com)
  • “At first sight Live 8 seemed to be a "not so much stuff added" Update but underneath there has changed a lot. The new Plugins, Instruments and the workflow additions really pay off the price for the Update (in my case 175€ for Ableton Live 8 Suite Download Education Version). There's just one that really disappoints me. I would have bought Live 8 much faster, without even less thinking, when Max for Live would already be implemented in the program. But in fact it isn't.” (Zett)
  • “i like the interface of ableton live 8 so far. i think live is a serious daw for windows users and a good alternative option to logic (i hate cubase and reason/i love fl studio but the soundquality is poor).” (The Dream)
  • “Since its arrival on the audio software scene in 2001, Ableton Live has carved out a niche as a hugely popular music production and performance tool… Live has always been something of a two-headed beast — a loop-based performance instrument on the one hand, and a linear recording and production platform on the other — and with the arrival of MIDI sequence support, opening the door to VST Instrument and effect hosting, Live became a serious contender as a studio production platform, while still enjoying a position on practically every performer's laptop on the planet.


    “Live's remarkable success comes down to some simple but well-considered design choices. Firstly, it knows about looping, and works very hard at cueing, synchronising and aligning looped material, and providing a sophisticated editing interface for loop-based music. Secondly, it implements a number of powerful and versatile features in a clean and reliable manner: instruments and drums can be 'racked' and chained in infinite combinations, audio can be routed and mixed in ways an actual mixing desk can only dream of, and the automation support is obsessively thorough and rock solid. Thirdly, Live's interface is clear and simple: one window, two views, and fixed panels for instruments and sample browsing.” (Nick Rothwell, Sound on Sound)
  • “Where most Recording Studio software programs are intended for stationary use in a static setting, Ableton Live has been tried, tested and refined for live performance functionality, combining the recording and editing tools and features of the best Recording Software programs with real-time effects, sequencers, loop machines to give electronica artists a powerful instrument on stage and artists and engineers of all musical genres and callibers a powerful tool to edit, modify and refine music off stage.” (Top Ten Reviews)
Have you used Live? Do you love it or hate it? What are your favorite features? Let us know in the comments.

Mastering Elements: Stereo Enhancement

When it comes to mastering treatments stereo enhancement is a tricky one. Beginners often make the mistake of overusing it or using the wrong plug-ins for the job. The good news is, with the right technique in place, there is a place for stereo processing in your mastering chain.
In this tutorial I’ll go through a few examples of different stereo processing that can be used in mastering and highlight some of the pitfalls that you might come across. I’ve tried to cover processors from as many different DAWs and manufacturers as possible.


Step 1: What to Avoid

The main thing that presents a problem when it comes to stereo treatment in mastering is the use of the wrong processor. Many DAWs supply stereo enhancement tools that are perfectly usable in the mix but are not really suited to a mastering environment.
The majority of these ‘mix’ processors are single band in nature, meaning that they treat the entire frequency range indiscriminately. This leads to a situation where we are processing parts of our mix that should remain untouched.
In most cases it’s our low end that should remain intact and that is something our single band plug-ins just aren’t capable of. Below are a few examples of the sort of processors I’m referring to and our example track processed by them.

The untreated example clip.
Download audio file (1.mp3)
The untreated recording.

The Cubase stereo enhancer.
Download audio file (1b.mp3)
… and treated with the Cubase single band enhancer.
In this example the stereo widening is pretty impressive but the low end mix has been threatened and loses is clarity and focus.

Step 2: The Subtle Approach

If you are a firm part of the ‘less is more’ camp then you may want to take the subtle approach to stereo enhancement. A simple linear phase equaliser can be enough to make your masters sound a little wider.
Before you apply any other mastering processors, duplicate your exported track and place it on two tracks in your chosen DAW. Pan one hard left and the other hard right. Now apply a mastering grade EQ to each channel. You can now apply different EQ settings to each side of your master.
Avoid working on lower frequencies here and concentrate on high mids and high frequency. Also keep Q values low to avoid coloration and hype. So for instance add a few db of high frequency in one side and remove a few db of the same frequency in the other.
Of course this will work better in some situation than in others. It can be a great way of adding some width to older recordings that perhaps lack a great stereo image. If you find the EQ adds too much coloration, you can also try the same technique using very slightly different compression values in each side.

Two linear phase EQs providing stereo enhancement.
Download audio file (2.mp3)
The audio with some subtle EQ based widening.

The duplicate channels panned hard.

Step 3: Dedicated Mastering Enhancement

Using a dedicated stereo mastering processor is probably the most popular route to achieving a wider image. There are many to choose from but the main thing to look out for is a frequency dependant interface.

Logic provides a frequency specific enhancer

As does Reson / Record.
To give you an example of what I mean check out the stereo enhancer included in isotope’s Ozone processor. Many DAWs include stereo processors suitable for mastering as well. Logic Pro 9′s enhancer, for example, is capable of effecting only certain frequencies.

Izotope Ozone’s fully features stereo enhancement area
Download audio file (3.mp3)
The audio is treated by Ozone.

Step 4: Parallel Tricks

There are some situations where more intense stereo processes can be used in mastering but some know how is required here. Setting up a parallel buss in your mastering project will allow you to apply pretty much any process to your parallel mix, without adversely effecting your final master.
With a second version of you mix set up you can apply even single band enhancement and mix to taste. Even in this situation it’s a good idea to filter the low end from the secondary stream to ensure that you don’t create a confused and incoherent low end mix.
This technique can also be used to add extra compression an limiting during the mastering process. In general parallel processing during mastering will create a much denser, louder result with a vastly reduced dynamic range, so if this is not what your after you may want to look at other options.

A parallel mastering buss set up in Cubase 5
Download audio file (4.mp3)
The audio is given added stereo width in Cubase.

Step 5: M/S Technology

Using M/S based processors is a great way to enhance the stereo content in your mix and it’s also extremely transparent (and mono compatible!).
You can route your own M/S processing set ups or use a dedicated plug-in. The latter is certainly the easier route but you will have to invest in the right plug-in and they aren’t cheap. Brainworx do make some really excellent products in this area.
Using M/S processing you can manipulate the mono and stereo data in your mix separately and not only enhance the stereo width but also force the lower frequencies to become mono. Extremely useful stuff!

The fantastic Brainworx ‘bx_digital V2′
Download audio file (5.mp3)
The file is treated to some M/S processing.

Step 6: Reverb on Your Master Anyone?

Now this is a bit of a strange one but some mastering processors do supply a mastering reverb section. Izotope’s Ozone has one and it’s certainly something that will supply a wider stereo feel, saying that I’m not 100% convinced on this one and would probably only reserve it to old recordings that needed restoration or a new lease of life.
All this said, I would never write off a technique, as what I may find strange someone else might swear by! So I would certainly look into it and see if its for you.

The mastering reverb section of the Izotope Ozone suite
Download audio file (6.mp3)
Ozone’s reverb is added.

How to Save Money in Your Home Studio

Studio equipment is expensive! If things keep breaking, replacing them can rack up quite a cost. If you’re like me, you want to make every cent count. Here are a few tips about cutting costs.

1. Consider Second Hand Gear

It's amazing how many people won't buy second hand gear because they have to have the “best”. They want something brand new and shiny. This train of thought will cost you a lot more money in the long run – money you might not have to have spent.
Second hand gear can be just as great as new gear. Only it's been used before and it's a hell of a lot cheaper! Why do most people sell their gear? It's usually because they're upgrading, not because there is something wrong with it.
Think about it. If you upgrade your console are you really going to keep the one you never use, or sell it and make some of your money back on the ridiculously expensive piece of new equipment you bought?

2. Take Care of Your Cables

Cables just cost a couple of pounds or dollars here and there right? But are they costing you more than they should be?
Inside your cables are thin copper wires that are very delicate. Bending the cable one way and then the other will and can break cause breakages. These things are delicate and need to be looked after. If you have to replace them every other week you're going to spend most your income replacing them.
There are proper coiling techniques that can be learnt that will save you a lot of money in the long run. Don’t wrap them around your elbow! You will also want to buy some cable ties so they don't keep uncoiling.
But if you're more of the DIY Person you could always bulk order the materials and make your own cables, I've known people to do this and they save a lot of money for that little extra work.

3. Make the Most of Your Space

Drums

We know drums are LOUD, and they take up a lot of space. If you're struggling for space and can't soundproof the room there is an alternative: drum samples.
Yeah, drum samples can do a great job on a track. Of course they’re not as flexible when trying to get the sound you want like you can with a real drum kit, and they will probably sound somewhat artificial. But if you're on a budget I guarantee these will do you well!
And you can probably find some cheap or freeware samples around the Net.

Amps

Amps take up a lot of room as well, and if you really want a small cheap setup these are the way to go. You can pay out a lot of money for expensive amps, or get yourself a amp simulator/plug-in. For example, Amplitube 3 is a great piece of software.
Again, these can sound quite artificial at times, but not always. And again, it’s not as flexible when trying to get the sound you want compared to owning your own amps.

4. DIY Equipment

Do vocal booths and pop shields cost too much? Looking for an alternative? Do it yourself! I warn you these things are not pretty if you're looking to make a professional studio. But they do the job pretty well.

Pop Shields – Tights

Yeah, that’s right. Go steal a pair of your girlfriend’s, wife's or mother’s tights. You can make a pretty good pop shield by stretching them over a coat hanger. Be creative – they may do a good job.

Vocal Booths – Foam or Two Couches

Who would have thought? I have known people to lie two couches on their side and put them together with a microphone inside. If you manage to stuff your singer inside you can apparently get quite good results!
Or you could just put a large piece of foam behind the microphone. This does a good job if your low on cash.
Again, be creative and use anything that you can get your hands on that will absorb sound. Carpets not worth bothering with – I've known people who’ve tried.

Cables – Build from Parts

This solution isn't so improvised: as I mentioned earlier, buying parts in bulk and putting together your own cables can save you a lot of money if you're a DIY person.

5. Get the Most from Your Computer

Computers are an important part of any studio, and you need a good one to run all your programs and plug-ins. There are a few ways to cut costs here, but not many.
Make sure you know what software you want to run before you get your computer, as some software only runs on certain operating systems. I prefer Mac OSX for Logic Studio, but that's just me. You might be perfectly happy running Cubase on your Windows computer.

Upgrade

Your computer will need a lot of processing power to run all these programs and plug-ins, but instead of buying a new computer when your old one starts to struggle, take off the case and upgrade some of the hardware.
A better processor and some more RAM should do the trick. And as we know WAV and AIFF files are large, so a bigger hard drive is important.
Converting your files to the smaller MP3 format is not recommended – it is a compressed file format that will ruin the quality of your audio files. I would recommend getting an external drive to put all your finished work onto, freeing space on your hard drive. And keep a backup in case your computer decides to break down on you (as they do).

Track Freezing

If your computer’s starting to struggle and you're a little low on cash, you can freeze tracks on most digital audio workstations (DAWs). This will write your plug-in details as audio, and save you some of that much loved processing power.